So what is a self-signed SSL certificate you may ask. A 'CA' or Certificate Authority is a trusted provided to generate a SSL certificate. Your local machine is a CA, but unfortunately and as expected the CA on your machine is not trusted (as should be) by any outside party, so any SSL certificate generated locally is good and trusted just there: locally! To get a SSL certificate generated by a trusted CA, you need to go to a commercial provider like 'GoDaddy' or 'Verisign' and purchase a SSL certificate. These Certificate Authorities are trusted on the internet and are able to provide SSL certificates with a set expiration time (i.e. 2 years out). Once applied, you can view the SSL certificate information of a secure site by pressing the secure lock icon in most browsers next to the URL, and will see who issued the SSL certificate, its expiration, and other public details like the public key.
If you happen to be on an Active Directory domain doing 'intranet' or internal software development, you may have a CA on the domain that will issue certificates which will be trusted within the domain. This is the way to go so one does not have to buy a GoDaddy or Verisign SSL certificate for every internal WCF service or hosted ASP.NET site. Check with your server folks (unless that's you!) to see if there is a CA that issues SSL certificates trusted by all on the domain.
If you don't have IIS7, generating a SSL certificate is still possible. You just do the similar steps under the 'Directory Security' tab in IIS for a given site. Using IIS to create the certificate does not mean we have to host our service in IIS. It just has a convenient 'wizard' style interface to generate certificates and place them in the proper 'stores'. You can manually decide which stores your certificate is placed in and trusted by using the Certificate Manager MMC snap-in. That is really off topic for this post, but good to see how local and purchased certificates are managed. The snap-in is not under the administrator tools by default so look to the following link if interested in adding or accessing this MMC utility:
How to Add Certificate Manager to Microsoft Management Console
To begin a new certificate request, open IIS7 and click on the root element which is your machine or server node. Locate the 'Server Certificates' icon and double click it:
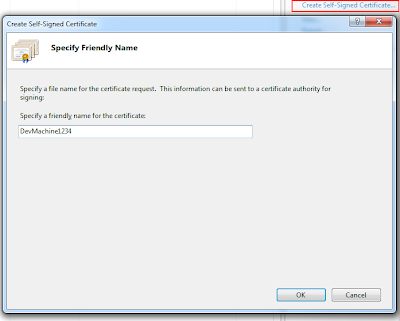
 On the right-hand side of the screen select the 'Create Self-Signed Certificate' link which will display the following dialog:
 This is the important part which is dictating the friendly-name of your certificate. For local WCF development you really have (2) choices: name the certificate 'localhost' or the name of your machine. I recommend the name of your machine as it is more explicit. So in the example below my machine name is 'DevMachine1234'. The name is important for hosting WCF services and applying a SSL certificate to the exposed endpoint. If the SSL name does not match the domain of the hosted service it will not work. In the case of local development, name the certificate the same name as your machine.
After completing the request you will see the SSL certificate has been generated by the local machines CA, the friendly name, and the certificate hash.
 The hash value will be important in the next post about applying this self-signed certificate to a port number that is dictated in the WCF configuration for a service hosted by a Windows Service. If you are applying the SSL certificate to a IIS hosted service or site, all you have to do is select it from the dropdown when configuring the 'https' binding in IIS7.


