Saturday, December 3, 2011

Visual Studio Live Orlando is almost here – December 5-9. Are you planning to go?


Visual Studio Live Orlando is just about here, and if you have not attended before or are a past attendee, check it out!

It’s a great opportunity to interact one-on-one with industry experts and Microsoft insiders, like Rachel Appel, Andrew Brust, Scott Cate, Billy Hollis and Rocky Lhotka on everything from .NET 4/Visual Studio 2010 and Silverlight to cloud computing, Windows Phone 7 development and HTML5. Plus, why wouldn’t you want to escape the December cold and be here in sunny Florida? Can you handle the ordered up weather below for this upcoming week at the conference?


This will be my 4th time to VSLive! and I think the knowledge and networking opportunities gained are worth the conference price 10 fold. I am asked so often how from new or junior programmers about how they can grow and advance their career. Attending a 1st class conference like this and learning from the experts is definitely a step in the right direction.

Interested in attending? There is still time, and if you are a programmer local to Central Florida come and see just how great this conference really is. Check out the special group rates offered for companies that bring 3 or more people. Register today at http://bit.ly/VSLOL11Reg.

Tuesday, November 15, 2011

What Happened To Windows Desktop Gadgets And Why Did Microsoft Abandon Them?

UPDATE (07/05/12): This link all but confirms that Desktop Gadgets will go away as I anticipated in Windows 8: Microsoft reportedly killing off desktop gadget support in Windows 8

A quick opinion entry here post bowling night (Yes I do have other hobbies besides programming!). Anyways back on topic I was quite disappointed to see a Tweet come across a few days ago stating that Windows Gadgets were being retired and the Gallery hosting them was no more. What?!?! I actually have always been a big fan of those things. I mean as a developer that sits in front of a machine with multiple screens for 8+ hours a day, I like all the information those things provide me at quick glance. After all we are in the information overload age (i.e. Smartphones, tablets, computers, etc.) and the gadgets fit right in to that role. Desktop gadgets were 1st made popular on Macs, then Yahoo came out with their "Yahoo Widgets", and finally Windows got in the game to offer support natively in the OS beginning with Windows Vista. However the gallery has been retired and support has quickly shifted away. Here is the official Microsoft Link on the status of the retired gallery and discontinued support:


Looking for gadgets?

Here is an excerpt from the above link stating it all:

"The Windows Live Gallery has been retired. In order to focus support on the much richer set of opportunities available for the newest version of Windows, Microsoft is no longer supporting development or uploading of new Gadgets."

OK I get it. Microsoft is positioning itself for Windows 8 and its new design including a focus on 'Metro Style Apps'. Windows Gadgets don't fit at all into that new design and really hinder in some ways the competing and improved look of Windows 8. You need folks to forget about these little anchored desktop apps and focus on Metro Apps in Windows 8. This could not be as strong of a directive with these 'dead weight' mid 2000 type apps lingering around (not really my thoughts, but probably the view at a meeting at Microsoft when the decision came to retire these widgets). I had already noticed a lack of developer interest and I understand this as well. It's not the sexy thing to spend time on in present day. If you were about to sit down and create a little weather app, would you make a Desktop Gadget or a Windows Phone 7 app for the marketplace? Easy enough answer. But even the minimal support was welcomed and still created a huge portfolio of selectable and free fun, productive, entertaining, and cool apps to have on the desktop. However I think the decision to retire the gallery and discontinue support is a bit premature and let me explain why. It is not often I disagree with Microsoft because I live for the technology they pump out of Redmond, but I am not on the same page with them on this decision.

There was a time from say 1993ish to 2005ish where it was almost a necessity to buy a new computer every few years to keep the hardware up with what the applications could do. Even simple tasks like having a browser open and Microsoft Word could be dauntingly slow on an older machine. So what does one do? Buy a new computer so multitasking became a possibility and didn't drive the user nuts. Also during this time period, the cutting edge industry development and the hardware were not that far apart. Using a Windows 98 box with VB5, Access, C++, etc. and building the best apps (excluding gaming) using the latest technology didn't require any special hardware. Using a standard home PC would allow one to create, build, and deploy these types of apps.

Now we have gotten to a point where I think us in the development community and those in the R&D sector moving the ball forward may not realize the disconnect that is upon us. The cutting edge technology and its expectations in my opinion will not excite a large portion of the market share. Sometime around the mid 2000's, PC hardware began to outpace the software running on it for the 1st time which helped drive costs down on PCs and allowed the consumer to breath a bit and not have to rush out to get the new OS and machine. "Hey if I can run my browser, email my family, and write Word documents, I am set!" Not everyone is 16 years old and rushing out to get the newest piece of hardware that supports the cutting edge technology, which we were all forced to do in years passed. Microsoft could rely on the fact that users would continue to buy newer, faster, smaller PCs and along with that the newest OS too. It was a nice harmony because the software and hardware naturally moved together and everyone (users and developers) had to keep up with the same pace. You didn't find too many Windows 95 users in 2003, 8 years after it came out, but you can certainly find a large portion of home PCs (and businesses too) that are still running Windows XP 10 years after release. This is because that stable, easy to use, machine doesn't warrant being replaced. In current day Microsoft can no longer expect the average user is going to buy a new piece of hardware to support the newest OS; that hand is not naturally being forced as it once was 10-15 years ago. Therefore support of what may be deemed 'legacy' technology or software (even if it is only 5 years old) has to be taken into consideration to keep the masses happy.

So what in the heck does that background have to do with Desktop Gadgets going away you ask? Well, I think for starters a lot of late migrators to Windows Vista or Windows 7 will be disappointed when they buy the computer and see one of the 'neat' features, Gadgets, is retired even before some had a chance to use them. But more prevalent than worrying about people who are behind in technology (hey you snooze you don't get to experience it like those of us that bought it on time, Ha!), is I wonder if Microsoft is going a little hard to place all their eggs in 1 basket with Windows 8. I don't think the masses will move quickly but this is not apparent by those of us in the technical community. We will all have it as soon as it is released to Beta and installed on Day 1. But that is a bad impression for the general use market share. I don't think everyone is going to abandon their PC for a tablet running Windows 8. And don't get me wrong; I don't think Microsoft is thinking this will happen either, but I do think some feel this is what "Everyone will be doing in 5 years..." I am not so convinced. I will be all over Windows 8 because of what I do and how much I like the technology, but I am not sure about Sister, Mom, Dad, Grandma, Friend 1, and Friend 2.

So I liken retiring the Windows Gadgets the start of Microsoft's reposition for its new OS, and is just the tip of the iceberg. I hope Microsoft doesn't continue to make decisions like this to slowly force people into buying Windows 8 because their nice, stable, Windows 7, Vista, or XP machine has 20% of its features retired or not supported. It's an aggressive stance and I get the feeling from the Build conference that Microsoft will be pursuing Windows 8 harder than any OS since maybe Windows 95. I just hope it does not come back to haunt Microsoft by leaving a bad taste in people's mouth by being unwillingly shuffled along faster than they care to. It's a fine line to walk.

This isn't the only instance were they suttly or explicitly phased out technology. For example, VS.NET 2010 will not support Windows CE development. Hold the horses!! I don't recommend making new CE apps at this point in time, but I have 1st hand experience working on a current 3rd party product that uses a propriatary device runnign on Windows CE. Makes total sense why Microsoft would not support CE development in VS.NET 2010: DO WP7 DEVELOPEMENT! But once again it's these decisions that I think don't agree with the masses as evident by the feedback from this Microsoft Connect entry:

No support for Windows CE and Compact Framework development in VS2010

So maybe a bit profound for the analyzation of why the Desktop Gadets went away, but I think there is a bigger picture here. And yes personally I am disappointed and don't think it would have slowed down Windows 8's new sexy features too much. You can still search the net for the individual gadgets if you are looking for a particular one, but they are already difficult to find so zip them up and save off the .gadget files on your machine. It will not matter beyond Windows 7 though because they will not be supported in Windows 8, so enjoy them on your already out-of-date Windows 7 PC (a little tongue-and-cheek there obviously). Or you can still use Yahoo Widgets which you can check out here, and they have a massive widget library:

Yahoo! Widgets

Well the nice thing about this blog is hopefully I can come back in a few years and maybe 'eat crow' showing I was all wrong. But for the time being I am disappointed to see the desktop widgets essentially discontinued, and I feel Microsoft may have missed the bulls-eye a bit on this decision.

Anyone reading this feel free to post links to websites, SkyDrive locations etc, to share .gadget files if you wish.

Wednesday, November 9, 2011

How To: Create A Thumbnail Image From A Video Using The Microsoft Expression Encoder SDK

In the modern day of the web, video players of all sorts of technology are being used from Flash, Windows Media Player, Silverlight, HTML, and many more. Commonly we will use a preview image (like seen on YouTube for example) to give a still image of what the video visually represents. You can accomplish the creation of this video thumbnail dynamically in .NET using the Expression Encoder SDK.

The idea is to load a video into a 'AudioVideoFile' object and then create a still image file based on a provided interval within the video. This gives managing video thumbnails a hands-off approach to creation saving a lot of time as opposed to someone needing to manually create this file from the Encoder product directly. Using the right naming convention, once created you could just load the thumbnail into your video player automatically without ever needing to touch the video.

To being you need to install Microsoft Expression Encoder and applicable service packs. As of this post the current version is Expression Encoder 4 SP2. The Expression Encoder 4 SDK and the documents are installed with the application. You can access the SDK from the Start menu by clicking All Programs and then clicking Microsoft Expression. The links below have the installations needed:

Microsoft Expression Encoder 4

Microsoft Expression Encoder 4 SP2

This method of creating a thumbnail is best suited for a WCF service or directly within a ASP.NET web application because of the required Encoder components. It must be installed on each server or machine where the code is ran. Therefore unless you have a limited user base, this may not work well within a WinForms or WPF application. In this case porting the functionality to a WCF service and having the remote applications call it to create the thumbnail would work best. This reduces the locations where the components need installed.

An interesting fact is you need the full version of Expression Encoder installed on the machine or server that has the code to generate the thumbnails, but you never actually need to open or use the Encoder product itself. In the past, I did have success installing a trial version of Encoder and having the code continue to run successfully with the SDK, but you will need to confirm or deny this independently. The SDK alone is not enough to allow the code to work; it relies on the Expression Encoder product being installed. For the purposes of this code here, you never actually have to open Expression Encoder.

After you have Expression Encoder, any current service packs, and the SDK installed you are ready to being. I recommend just making a little test harness in a web app or WPF app locally to see how it works. Then you can port it out to a service or in an actually application.

To being add the following references to your application from the following location (assuming you are using the Expression Encoder 4 SDK) "C:\Program Files\Microsoft Expression\Encoder 4\SDK\":

Now add the following 'Imports' or 'using' statements to your code:
Imports System.IO
Imports System.Drawing
Imports System.Drawing.Imaging
Imports Microsoft.Expression.Encoder
Next let's make a method named 'GenerateVideoThumbnailImage' that takes some input parameters about the location of the video, the size of the thumbnail to generate, and the path to save the generated thumbnail image. The code below shows using the Expression Encoder SDK to generate the thumbnail:
Private Sub CreateVideoThumnailImage(ByVal VideoPath As String,
ByVal SecondIntervalForThumbCapture As Integer,
ByVal ThumbnailWidth As Integer,
ByVal ThumbnailHeight As Integer,
ByVal ThumbnailSavePath As String)

'Create the AudioVideoFile object which stems from the Expression Encoder SDK .dlls
Dim avFile As New AudioVideoFile(VideoPath)

'Create a value equal to the length of the video
Dim FileDuration As Double = avFile.Duration.TotalSeconds
'Set thumbnail value to second interval indicated by argument passed in:
Dim ThumbnailLocation As Double = SecondIntervalForThumbCapture

'If the interval passed in is at a location longer than the video, then redefine an interval to the mid-point of the video.
If ThumbnailLocation > FileDuration Then
ThumbnailLocation = (FileDuration / 2)
End If

'Create the formatted filename to append on to the VideoFile (Format = "VideoFileName_thumb.png")
'Note: You can change this logic to be a passed in value or whatever you would like. This is not critical to generating the thumbnail image.
Dim FormattedFileName As String = Path.GetFileName(VideoPath)
'Strip off the video file extension and add an "_thumb" and the format extension (.Png will be used) to be saved to.
FormattedFileName = Path.GetFileNameWithoutExtension(FormattedFileName)
FormattedFileName += "_thumb." & ImageFormat.Png.ToString().ToLower()

'Create ThumbnailGenerator object to get thumbs from AudioVideoFile. Use the Width and Height arguments passed in to determine the size to Save.
Dim ThumbnailImageGenerator As Microsoft.Expression.Encoder.ThumbnailGenerator = avFile.CreateThumbnailGenerator(New System.Drawing.Size(ThumbnailWidth, ThumbnailHeight))
'Create the thumbnail image based on interval set above
Dim ThumbnailImage As Bitmap = ThumbnailImageGenerator.CreateThumbnail(TimeSpan.FromSeconds(ThumbnailLocation))
'Save the file to the ThumbnailSavePath argument passed in with the formatted file name (above) added:
ThumbnailImage.Save(ThumbnailSavePath & FormattedFileName, ImageFormat.Png)

'Clean up
ThumbnailImage.Dispose()
ThumbnailImageGenerator.Dispose()

End Sub
Here is a sample call to the above method that will output "MyVideo_thumb.png":
'Make a call to generate a thumbnail of the video at the '10' second interval (size will be 150x150) and save it to the same directory:
CreateVideoThumnailImage("C:\Videos\MyVideo.wmv", 10, 150, 150, "C:\Videos\")
Previously I have used the 'MediaItem' object and its 'GetThumbnail' method within the SDK to generate the thumbnail. I had success using this on Windows Server 2003 and the Encoder 2 SDK, but could *never* get it to work on Windows Server 2008 with either the Encoder 2 or Encoder 4 SDK. It works so long as the code is directly run within your application, but if you try to port it out to a service (i.e. WCF) regardless of the hosting type (IIS or Windows Service) and regardless of the user context (Administrator), the service would always throw the following exception:

"Microsoft.Expression.Encoder.InvalidMediaFileException: File type isn't supported. ---> Microsoft.Expression.Encoder.UnableToAnalyzeFileException: Exception from HRESULT: 0x80040218"

I had a lengthy MSDN post that was never resolved and can be read about here, but my strong recommendation is to port any use of the 'MediaItem' object over to using a 'AudioVideoFile' object. There seemed to be some underlying caching of credentials or some other oddity with trying to load the video file into the MediaItem constructor that I could never get to work properly. However with the code above, I can successfully implement it in a WCF service hosted by IIS or as a Windows Service. Just make sure to run the app pool hosting the IIS site or Windows Service under the LocalSystem or other Administrator account to make sure the service has the proper permissions.

Lastly, you may run into issues if you try and generate a thumbnail image from a video in which your machine does not have the codec installed. For information on this, please see one of my older posts that is listed below:

Fixing the "File type isn't supported" Error When Working With Expression Encoder SDK

Tuesday, October 25, 2011

Rooting a Motorola MB502 Charm On Android 2.1 Eclair to Store Apps On SD Card

Another post here outside the '.NET Realm' but I wanted to post some information to help users with the same or similar phone and issue. So I recently got a new unlocked Motorola Charm MB502 for $99 from NewEgg.com (here) so I don't have to be under contract for another 2 years with AT&T. This was my 1st experience with an Android based phone and I quickly found out its idiosyncrasies. However overall this is a fantastic phone for its capabilities and price so I am happy with it.

The phone has a miniscule 200mb or so internal memory and came with no MicroSD card. I starting going hog wild downloading all kinds of cool apps (for free of course) and in no time the phone memory was full. It was to the point where the phone would freeze and I couldn't even send or receive texts. So I had already planned to get a MicroSD Card so I got a Class 10 32GB PNY MicroSD card from NewEgg (this model). The card is amazing and has some crazy read/write speeds. So that's it I am all fixed right? 32GB is plenty of space. WRONG!

The Android 2.1 platform (codenamed Eclair and released January of 2010) only allows storing apps on the internal memory, and music and pictures can go on the external memory. Well that's a bit limiting, but there is a work around. Android 2.2 streamlines this quite a bit to a single command line statement, but on 2.1 it’s quite a bit more involved. However, everything I read for was a complete mess of steps and awfully written walk-throughs so I am mostly writing this post in case search engines pick it up to help out users of this phone or with a phone containing Android 2.1.

So let’s begin with the overall steps that have to take place to allow the phone to store apps downloaded to the external SD card:

1. Download the USB drivers for your phone and install them.
2. Buy a MicroSD card
3. Partition the MicroSD card into 2 parts using 'Mini Tool Partition'
4. Install the MicroSD card into the device.
5. Place the phone in 'Debug' mode when connected via USB
6. Connect the phone to the computer via the USB cable.
7. Root the phone with 'Super One Click'
8. Reboot the phone
9. Link the apps to the SD card using 'Link2SD'

It’s not that difficult to accomplish (can all be done in order in < 30 minutes depending on partitioning size on card), but the forum posts detailing these steps are incomplete. This process was compiled by about 6-8 different sources. Before getting started it is important to note, that while this is not an overly difficult procedure it is probably not for you if you do not have some savvy working with computers and mobile devices. The potential exists here to completely screw up your phone and have a mess on your hands. I am just posting this 'as-is' and have no real expertise on Android phones, so advanced follow up questions for anything related here are better directed to one of the Droid forums and not here. So let's get into each step:


1. Download the USB drivers for your phone and install them: You need to connect your phone to your computer and have it recognized. For the MB502 Charm, you can download the USB drivers at the following link -> Drivers for MB502 After installing the drivers, go ahead and connect the phone to the computer and make sure it worked.

2. Buy a MicroSD card: If you are only planning on installing apps and taking a few pictures then 8GB or 16Gb is plenty of space. However if you plan on dropping the entire MP3 library on your phone (as I did) then go for the 32GB size. As for Class? I recommend a Class 10 card because of the 10mb/s write speeds. Nice for transferring MP3 files to the phone and reducing lag time after taking a picture when being written to the device. If just doing simple apps and no music a Class 4 or 6 should suffice. I highly recommend getting a SD card adapter or something to plug in the MicroSD card via USB for partitioning outside the device in Step # 3.

3. Partition the MicroSD card into 2 parts using 'Mini Tool Partition': Download the 'Mini Tool Partition' (for Windows not the phone) utility to partition the MicroSD card from this here: Download Mini Tool Partition Once downloaded and installed, insert your SD Card adapter into a USB slot containing the MicroSD Card so it can be partitioned. The card must contain 2 partitions: 1 for the main externally written files (pictures and music), and the 2nd partition is for the downloaded apps. Before partitioning make sure to copy off an data on the card (unless it's new and has nothing on it). Open up Mini Tool Partition, right click on the drive representing the card (make sure you select the right drive!!) and say 'Delete'. Now let's make our (2) partitions. The 1st should be named 'primary' and be set as a 'Primary' partition. As for the 'File System': if you have a MB502 Charm then you have to use FAT32 for both partitions. The phone does not recognize the other format types. On other Android phones you can try ext2, ext3, or ext4. It is not a limitation of the Super One Click program, but rather the individual phone. As for size, most say 500mb to 1GB is enough for the apps since they are so small. I did 25GB for my primary, and did 5GB for the apps. You can divide the partitions how you feel is needed. Below are the properties for Partition 1:


Now create the 2nd partition; I named it 'Apps_Data'. It too must be created as a 'Primary' partition as displayed below:


Finally, when all selections have been made select 'Apply' in the upper-left hand corned to have the partitions made on the MicroSD card.

4. Install the MicroSD card into the device: Easy enough. Take the back cover off the MB502 and install the MicroSD card. It is not a requirement but I powered off my device, inserted the card, and then turned the power back on just to do the process cleanly.

5. Place the phone in 'Debug' mode when connected via USB: Consult your manual on how to do this. For the MB502 on the home screen tap the 'Menu' button (left soft key) and select 'Settings'. Scroll to and select 'Applications', select 'Development', and then turn on (check) 'USB Debugging'.

6. Connect the phone to the computer via the USB cable: I usually have my phone unlocked and on when I connect via USB. Give it a few minutes and make sure Windows (or whatever OS) recognizes the device.

7. Root the phone with 'Super One Click': In order for apps to eventually be placed on the MicroSD card, we need to have 'SuperUser' permissions for the Link2SD app. In order to gain this level of access we 'Root' the phone. Rooting the phone also allows you to uninstall any 'System' installed apps. I quickly learned one of the apps I downloaded installed a ton of junk as system apps, and I couldn't uninstall them...until I rooted the phone that is. The easiest way to do this is with an app named 'Super One Click' which runs on Windows (not the phone). Download the application from here: Download Super One Click Install the application and open it up in Windows. All you have to do is press the 'Root' button (displayed below). When asked if you want to install the app, I stated 'Yes' which allows SuperUser to work on the device. Once complete the device will be rooted. For a full list of phones which Super One Click works with, check out the following link: Compatibility List for Super Once Click


8. Reboot the phone: If the Super One Click does not prompt for a reboot after disconnecting the USB cable, then go ahead and disconnect the USB cable after the rooting process is complete, and power off and back on the phone.

9. Link the apps to the SD card using 'Link2SD': Go to the Market, and search and download 'Link2SD'. This application will allow you to manually select installed apps and move them over to the SD card. This process does not happen automatically, so make sure to move apps over to the SD card after installation. Sounds like it might be a pain, but it is really easy and takes only about 5 seconds to do. Once 'Link2SD' is installed, open it up. It is going to go through a series of steps to gain 'SuperUser' access and may ask you to reboot the phone after creating some boot scripts to be used. Follow all on-screen instructions including reboot if required. These steps are only 1 time and not required after completed successfully. I think the 1st time I tried Link2SD it didn't work so I rebooted the phone and tried again and it worked, so keep this in mind. After Link2SD finishes it configuration (including reboot), you are done! Open up the Link2SD app and scroll to any app you want to move over to the SD card and select it. Scroll down to select 'Create Link', and the press 'OK'. You will see a message about Link2SD getting 'SuperUser' access and then your app will be moved to the SD card! You can also use Link2SD to uninstall those pesky spam installed system apps if this happened to you. An app is installed on the system if you see its path start with /system/app/.... Don’t uninstall important apps, but it is useful to uninstall something that was never originally wanted.

That's it! If it didn't work, you probably want to go back through step by step and make sure everything worked properly. The Link2SD app is very picky about those partitions so make sure to get them right. If it is not working it might be because it does not recognize the type of partition you created. FAT32 is the safest bet and the only working one I found on the MB502 Charm. If you need more help, I recommend seeking out one of the Android User Forms where you can ask questions and get further help. ...or just fork out the money and buy a newer phone. :P

Thursday, October 13, 2011

Specifying Document Compatibility Modes for ASP.NET Intranet Sites using IE8

I noticed some oddities on the way an ASP.NET website I was working with was rendering on the intranet, but not through the Cassini development server in VS.NET 2010. This of course makes sense because the development server does not parse and render identical to IIS, but it was still puzzling.

After a bit of research I found that the following setting in Internet Explorer 8: Tools -> Compatibility View Settings -> ‘Display intranet sites in Compatibility View' was checked by default. This ends up having your site render in IE7 mode and was the cause of the odd rendering in my case (i.e. entire dropdowns scrolling along with the screen, HTML header tags not sizing properly, etc.).

The initial thought is just to deselect the option and allow the browser to work in IE8 standards mode. However since we are discussing 'intranet' applications, this problem would persist to all clients of the application unless a mass update was pushed out via group policy which is unlikely.

The easiest fix is to set the document compatibility mode for the site in the Master Page(s) or main page of the site to the browser standard you wish to use. The post is almost outdated as soon as it was published because it is speaking about a browser that is 2.5 years old, but as many enterprises are still on IE8 because of Windows XP, this unintended switch may not be favorable to the developer. All that must be done is add the following meta tag in the header of the webpage (the HEAD section) before all other elements except for the title element and other meta elements:
<!-- Enable IE8 Standards mode -->
<meta http-equiv="X-UA-Compatible" content="IE=8" />
After updating the site on the IIS server and bringing it back up in IE8, you will notice your site render properly even with the default IE8 settings to display 'intranet' sites in ‘Compatibility View’. This topic is actually much more involved than the specific piece of advice covered here, so look to the following if you need any further information.

Defining Document Compatibility

Friday, September 23, 2011

Begin StoryBoard Animation Within A DataTemplate In Silverlight

Animations in Silverlight are a great way to add a dynamic feel to the aesthetics of your Silverlight page or control. Within Silverlight, using a DataTemplate to define a control’s properties and look when a control will be repeatedly used or displayed is the perfect solution. However if you add an Animation to the DataTemplate, trying to set it in motion from the code behind is not as straight forward as it initially seems.

Let's say you have a simple animation and you want it to run when the 'MouseEnter' event fires. In VB.NET, the traditional thinking is to go into this event that is exposed by the created DataTemplate and call 'MyAnimationStoryboard.Begin()'. Guess what though, the app will build, run, hit the event upon having the mouse enter, but the animation will not begin. No exception is thrown, it is just nothing happens.

It turns out that the StoryBoard is only locally known to the object containing it within the DataTemplate, so we must 1st access that control's resources where the storyboard exists, and then we will be able to begin the animation.

So here is a DataTemplate with a Grid control and a StoryBoard. The code is being kept simple because the solution for this is in the code behind.
<DataTemplate x:Key="MyTemplate">
<Grid Width="100" Height="100"
Opacity="0.75"
MouseEnter="MyGrid_MouseEnter" >
<Grid.Resources>
<Storyboard x:Name="MyTemplateAnimate">
<DoubleAnimationUsingKeyFrames Storyboard.TargetProperty="(Shape.Fill).(GradientBrush.GradientStops)[4].(GradientStop.Offset)"
Storyboard.TargetName="path">
<EasingDoubleKeyFrame KeyTime="0:0:0.3" Value="0.296"/>
<EasingDoubleKeyFrame KeyTime="0:0:0.4" Value="0.384"/>
<EasingDoubleKeyFrame KeyTime="0:0:0.5" Value="0.475"/>
<EasingDoubleKeyFrame KeyTime="0:0:0.6" Value="0.529"/>
</DoubleAnimationUsingKeyFrames>
</Storyboard>
</Grid.Resources>

<Path x:Name="path" Data="M0,0L50,0L25,50L0,0L0,50L0,0">
<Path.Fill>
<LinearGradientBrush EndPoint="-0.419,0.662"
MappingMode="RelativeToBoundingBox"
StartPoint="1.051,-0.137">
<GradientStop Color="#FF18250A" Offset="1"/>
<GradientStop Color="#FF18250A"/>
<GradientStop Color="#FF345016" Offset="0.725"/>
<GradientStop Color="#FF345016" Offset="0.275"/>
<GradientStop Color="#FF779F4C" Offset="0.5"/>
</LinearGradientBrush>
</Path.Fill>
</Path>

<TextBlock x:Name="TextBlock1">
</TextBlock>
</Grid>
</DataTemplate>
The DataTemplate does expose the needed 'MouseEnter' event in the code behind but the problem is the StoryBoard is in the child 'Grid' control. Therefore we have (2) options: use the VisualTreeHelper class to find the right child control, or simple define a 'MouseEnter' event on the actual Grid control. I went for the latter option as it is the easiest.

Let's add the event we declared on the Grid in the XMAL named 'MyGrid_MouseEnter' to the code behind. We need to cast the sender which is the Grid itself, and then find the StoryBoard object within the Grid's resources. Once we have acquired and casted the exact StoryBoard, then we can call the .Begin() method.
Private Sub MyGrid_MouseEnter(sender As Object, e As System.Windows.Input.MouseEventArgs)
'Cast the sender to an object of type Grid, so we can find the StoryBoard
Dim MyTemplateGrid As Grid = DirectCast(sender, Grid)
If MyTemplateGrid IsNot Nothing Then
'Find the StoryBoard by name and then begin its animation sequence.
Dim StyBrd As Storyboard = TryCast(MyTemplateGrid.Resources("MyTemplateAnimate"), Storyboard)
StyBrd.Begin()
End If
End Sub
That's it, run the Silverlight app, and the StoryBoard within the DataTemplate will now run. If the controls in this example were not exactly what you have, the principal is you need to drill down to find the containing parent object of the StoryBoard to then get access to the storyboard. If you need, you can use the VisualTreeHelper to drill down to the proper child control. If you need a sample of using this class please refer to the following link:
http://forums.silverlight.net/t/99891.aspx

Wednesday, September 21, 2011

Exposing Multiple Binding Types For The Same Service Class In WCF

Have you ever wanted to expose multiple binding types in WCF for the same service class? Well I have but it is not directly apparent on how to accomplish this. My thought was, “I have a single service and I want it to be consumable by both net.tcp and http bindings. Not a big deal, right?” Well in the end the code needed to make this happen is not all that complex, but getting to the solution took some work as usual.

My thought process initially was to try and figure out how to make the WCF configuration allow this condition with a single service, but this method has some side effects. My 1st attempt was to create a single service with multiple endpoints and mex configurations, with each endpoint configuration having a different binding type (http and net.tcp). This actually works, but comes along with a side effect which I did not care for. The problem was when a client would consume my service (either via net.tcp or https) both endpoint configurations were added to the client. This isn't a huge deal, but I wanted the service configurations to deploy independently to prevent any confusion. Also if the client requests only the http binding endpoint, then that is all I want them to get; not the net.tcp configuration as well or vice versa.

Next I wanted to try using (2) different service configurations within the same single WCF service. However, a WCF service class can at most be exposed once in configuration by a single service configuration. If you try and configure (2) separate services differing only in endpoint binding configuration but attempt to consume the same service class for both services, you are going to get an error. "A child element named 'service' with same key already exists at the same configuration scope. Collection elements must be unique within the same configuration scope". Simply changing the 'name' property on the service configuration is not an option, because the 'name' property represents the class that implements the service contract. Arbitrarily changing the name will break the service.

The solution I came up with that solves all of these requirements is to have the single main service class that contains the implemented logic, Implement (2) additional new Interfaces that will allow distinction or uniqueness for the endpoint contract configuration. We will also add (2) new service contract classes that inherit the main service class and provide uniqueness for service class configuration. This masquerade allows making the services appear to be unique in consumption, but really point back to the same logic which was what was the original requirement.

As I mentioned before I do not want to expose multiple endpoints from a single service implementing a single contract due to the unwanted side effects, but rather have multiple services each with a single endpoint, implementing the same contract. To do this each service needs to be unique, but when attempting to make separate services each serve up the same service class implementing the contract, there is no uniqueness. The 'ServiceEndpointElement.Name Property' in configuration must point to a class within the service. Because we want (1) unique endpoint per service, we need a unique service class as well. The new classes Inherit from the primary Service class providing all the main service functionality, but yet provides a unique service class entry point for the ServiceEndpointElement.Name Property. Again, the reason we do not want a single service exposing multiple bindings, is because upon client consumption all (1...n) binding configurations for a single service are downloaded and configured even if the client only wanted say the 'net.tcp' binding. To reduce confusion, each service configured ultimately exposes the identical functionality but provides a separate service class value for the ServiceEndpointElement.Name Property.

Let's take a look at how to implement this solution. To begin, here are the (3) main service contracts:
<ServiceContract()>
Public Interface IMyWcfServiceTcp
Inherits IMyWcfService

End Interface

<ServiceContract()>
Public Interface IMyWcfServiceHttp
Inherits IMyWcfService

End Interface

<ServiceContract()>
Public Interface IMyWcfService

<OperationContract(Name:="MyMethod1")>
Sub MyMethod1()

<OperationContract(Name:="MyMethod2")>
Sub MyMethod2()

<OperationContract(Name:="MyMethod3")>
Sub MyMethod3()

End Interface
Next are the (3) classes which WCF configuration will use in the service configuration:
Public Class MyWcfServiceTcp
Inherits MyWcfService

End Class

Public Class MyWcfServiceHttp
Inherits MyWcfService

End Class

Public Class MyWcfService
Implements IMyWcfServiceTcp, IMyWcfServiceHttp

Public Sub MyMethod1() Implements IMyWcfService.MyMethod1
End Sub

Public Sub MyMethod2() Implements IMyWcfService.MyMethod2
End Sub

Public Sub MyMethod3() Implements IMyWcfService.MyMethod3
End Sub

End Class
And finally, here is the WCF service configuration:
<!--*****WCF Hosted Service Endpoints*****-->
<services>
<service behaviorConfiguration="MyWcfServiceTcpBehavior" name="MyWcfServiceTcp">
<endpoint address="" binding="netTcpBinding" bindingConfiguration="MyWcfServiceTcpEndpoint"
name="MyWcfServiceTcpEndpoint" bindingName="MyWcfServiceTcpEndpoint"
contract="IMyWcfServiceTcp" />
<endpoint address="mex" binding="mexTcpBinding" contract="IMetadataExchange" />
<host>
<baseAddresses>
<add baseAddress="net.tcp://localhost:8000/MyServices/MyWcfService" />
</baseAddresses>
</host>
</service>
<service behaviorConfiguration="MyWcfServiceHttpBehavior" name="MyWcfServiceHttp">
<endpoint address="" binding="wsHttpBinding" bindingConfiguration="MyWcfServiceHttpEndpoint"
name="MyWcfServiceHttpEndpoint" bindingName="MyWcfServiceHttpEndpoint"
contract="IMyWcfServiceHttp" />
<endpoint address="mex" binding="mexHttpBinding" contract="IMetadataExchange" />
<host>
<baseAddresses>
<add baseAddress="http://localhost:8001/MyServices/MyWcfService" />
</baseAddresses>
</host>
</service>
</services>
Notice how each service configuration points to its own class, and each endpoint points to its own individual contract. However we know under the covers, both services expose the identical functionality. The difference: choice of binding type, and ability to only get the single binding's configuration added to the client (not both types) upon consumption.

Take note - if having your client getting multiple binding configurations for requesting a single endpoint does not bother you then procedure is not needed. Just define a single service with multiple endpoint configurations and multiple mex endpoints and you are done. However, if exposing your service with multiple binding types and having the client only receive the single endpoints configuration is important, then this should help fulfill the requirement.

Friday, September 16, 2011

My Initial Thoughts on Windows 8 And The Build Windows Conference

If you are a developer of any type and have interest in any type of Windows based development then you probably knew the 'Build Windows' event was taking place in Anaheim, CA this past week from Sep.13-16. I was not in attendance, but like hundreds of thousands of other developers I tapped into the site which almost with perfection streamed the keynotes and Channel 9 video via a Silverlight player. Wait! Silverlight and not a HTML5 video player!! I thought SL was dead to Microsoft (says the peanut gallery and technical blogs). Nope, and it was a nice touch to show how Silverlight works so well.

I have not had a chance to watch all of the archived video, but I had it playing in the background often this past week to try and pick up a tid bit here and there. It is obvious to me that Windows 8 is the 1st revolutionary mind bender that we have to a user’s interaction, application development, and from a OS perspective in quite some time. Phrases and words like 'Metro Apps', 'Fast and Fluid', 'Touch First', and 'WinRT' were used time and time again. Windows 8 takes a 'Touch First' approach and is no surprise to me at all. With the onslaught of tablet and touch technology we have seen in the last 4-5 years and especially from front runner Apple with the iPad, iPhone, and iTouch products, it is apparent to me that Microsoft is firing back on the offensive to get in and hopefully dominate the market share in this new technology age.

Think about it - the way the Build conference and mainstream technology presents technology today, you would feel that the mouse, keyboard, desktop and laptop PC might be dead! Not necessarily, but the days of the classic 'Start' button OS, static desktop, mouse and keyboard environment may be numbered. We have the mobile and tablet world to thank for this (in a good way I think).

Windows 8 appears to have taken a lot of the good features from Windows Phone 7 and incorporated them into the OS. If you have seen or used a Windows Phone 7 device, then you will be comfortable with viewing Windows 8. This style of application development deemed 'Metro Apps' are the applications that run on the forefront of Windows 8. This appears to be Microsoft's approach to help make any type of developer have the potential to be marketable by selling apps in the ‘Windows Marketplace’. I heard numerous times from presenters about how Microsoft wants the developer to make money and come up with the new 'Angry Birds'. They are pushing us to be Windows Developers of Metro style apps on Windows 8 probably for a few reasons: they hope we will get excited about coming up with an app to sell and make money, and in the meantime we have the hook in deep to Microsoft technologies. I don't really have any issue with this at all. Microsoft is a business and they are positioning themselves to be profitable and current or even better 'leading' the industry and right now touch, tablets, smart phones, mobile, and cloud development and applications reign supreme. The only thing I am thinking about is don't forget the professional developer doing Enterprise Development.

Don't get me wrong, Metro apps look cool and will probably be a great success. Metro apps were mentioned to not be a 'one-size-fits-all' solution, but yet still seemed to be touted as the future of application development on Windows. Mainstream large applications seemed to be mentioned or represented as a footnote to Metro apps. Well I have to say not everything reasonable in software development can be crammed into a social networking twitter app, a silly (but clever) Angry Birds game, or a grocery shopping list app-let. Some presentations nowadays makes it seem like the only apps used are Twitter, Facebook, Email, and the Internet and everything else is a second class citizen. I may have to modify this post in a few years, but I don't think automating complex business rules can be simplified into the touch of a finger and a Metro style app. I know Microsoft knows this, and so did all of the other developers that were in attendance. However I want to make sure that Microsoft continues to push hard as they have been in the last 10 years with technologies in .NET to create solutions for large Enterprise applications that solve complex business solutions. A Facebook and Twitter stream combo Metro app and a cloud syncing picture app are not going to drive the business. But they will excite 16 year old kids that will buy a Windows 8 tablet and buy lots of little stuff like this from the Marketplace. Microsoft is smart for recognizing this and positioning themselves to make money. They guys like me that develop in .NET for a living off a license purchased every few years is probably only enough $ to keep the lights on in Redmond. Therefore I say I understand everything Microsoft is doing and the direction they are going, I just hope they continue to be just as strong with .NET moving forward as they have been in the past.

There were some strong .NET presentations given on Channel 9 and by people like Scott Guthrie which got me really excited about moving forward. These are the pioneers of the .NET Framework and continue to move it forward at Microsoft. I look forward to the Async Framework in .NET 4.5 and they also mentioned some language specific enhancements like VB.NET getting Iterators like C# has had since .NET 3.5. I don't want the flavor of this post to make it sound like Microsoft is trying to box us into being Windows developers only making Metro apps, but it was hard not to think like this at times based on the content I watched. The Channel 9 content kept me breathing easy and feeling like the 10 million of us that are profession developers out of 100 million estimated developers worldwide (Steve Ballmer's numbers) still have a strong presence in Microsoft. However I do not blame Microsoft trying to cater and market stronger to the 90 million non-professional developers that will be making Metro style apps trying to come up with the next dynamic weather app or Angry Birds game. It is the smart thing to do from a business perspective as opposed to standing up on stage going on and on about the Async framework or other .NET enhancement that is catering to the 10 million professional developers.

To sum up the conference from my viewpoint (and again, I was not there so I didn't get the full content), I am excited for Visual Studio 11, .NET Framework 4.5, Windows 8, and touch first technology. Although I still get the feeling that everything they said at the conference makes sense, but it does not make sense for everybody. Grasp that? Regardless I look forward to Windows 8 and the future.

For developers interested in the new WinRT APIs in Windows 8, have a look at the following article which describes it best I have seen thus far:

WinRT demystified

Wednesday, September 14, 2011

Finding Duplicate Rows Using TSQL

Ok so here is a tired old post that has been blogged about since the internet’s inception, right? Well sort of... I am not going to yammer on here too much about a topic that is covered exhaustively on technical blogs like mine, nor do I claim to be a 'SQL Guru' of any sorts, but I noticed a lot of the sites offering help on this topic always did so for a very basic and simple example. Well I too am going to use a simple example but expand on its usefulness to hopefully help out a few wondering the search engines in need of help. Your typical 'find duplicate rows in a table by ID' example is shown below:

SELECT ID
FROM Books
GROUP BY ID
HAVING COUNT(ID) > 1
Another example using a varchar column:

SELECT Title
FROM Books
GROUP BY Title
HAVING COUNT(Title) > 1
Ok the above is great for small tables, to manually track down records, or maybe as part of a larger query or subquery. However odds are you are going to need additional columns of data and probably the actual duplicate rows themselves. Well initial thought might be to expand the simple example query above to include the additional fields, but you will quickly find out that the query will yield no results. This is because the query above groups on the columns in question having a count greater than 1. Well if you add additional columns to the query that do not contain duplicates, then this condition is no longer 'True' and thus no results are returned.

The fix is to Join in another copy of the same table. One table's purpose is to focus on the duplicate rows, and the second table's purpose is to focus on the additional columns needed in the results. When joining on the same table an Alias must be given to distinguish between the two. Here is the expanded example from above, that will return all of the *actual* duplicate rows, and any additional information that was sought:

SELECT bAll.ID, bAll.PublishDate, bAll.Title, bAll.Price
FROM Books bAll
INNER JOIN (SELECT Title
FROM Books
GROUP BY Title
HAVING COUNT(Title) > 1) bDups
ON bAll.Title = bDups.Title
ORDER BY bAll.Title
Lastly, here is a template of the above query that you might want to keep handy as sort of a 'fill-in-the-blanks' template (remove brackets - they are just placeholders and not required syntax) for your own 'finding duplicate rows' needs:

SELECT [AliasAllTable].[Field1], [AliasAllTable].[Field2], [AliasAllTable].[Field3]
FROM [MainTable] [AliasMainTable]
INNER JOIN (SELECT [DuplicateFieldName]
FROM [MainTable]
GROUP BY [DuplicateFieldName]
HAVING COUNT([DuplicateFieldName]) > 1) [AliasDuplicateTable]
ON [AliasAllTable].[DuplicateFieldName] = [AliasDuplicateTable].[DuplicateFieldName]
ORDER BY [AliasAllTable].[DuplicateFieldName]
I welcome any SQL experts to comment on streamlined ways to accomplish the identical task; I can certainly update the post with additional information. However with the plethora of examples available, too many seemed to be of the basic flavor example and I wanted to introduce the additional functionality that is probably often sought after.

Sunday, September 11, 2011

9/11 - 10 Years Later

Traditionally I do not write about anything on my blog outside the realm of programming, but the 10th Anniversary of the tragedy that occurred on September 11th, 2001 is certainly worth mentioning and reflecting upon.

To most of us concerned with reading this blog, we are of an age where we probably remember exactly what we were doing and where we were 10 years ago today. At the time I was living in Charlotte, NC where I was in my last semester at U.N.C. Charlotte and preparing for a large job fair on campus. It was also exactly 1 month after my wedding which was celebrated in Puerto Rico with my wife's and my family on August 11, 2001, and also in which we also just celebrated our 10 year wedding Anniversary last month. It was a new and transitioning period in my life. At the time I was vying for my 1st job and it was right after the ".com bust" and programming jobs were few and far between. We had companies like Alltel come to campus and have 200 people show up to a brief announcement, for only 2 open positions. I was dressed to the nines and headed to Kinkos to make copies of my resume for the job fair. My wife called me and with a bit of confusion told me, "Some hotels in New York City had been blown up...", but I wasn't really sure what she was talking about. When I arrived at Kinkos I knew something even bigger was occurring when I read a sign on the door that said: "We are closing at noon due to the recent events." I went back to my apartment and turned on the TV as was everyone else. The rest is a sad part in our nations history.

I read the tributes made in our local paper today and it was shocking and eye-opening to once again see the names of all of the people that lost their lives on 9/11. It was a bit jaw dropping when looking at what was about a 5 point font used to fit all of the names in on roughly 3 pages. I remember it was about 3,000 people, but seeing it in print was a reminder of what happened on that tragic day. Of course this does not include all of the men and women of our military who have made the ultimate sacrifice since in the wars abroad.

Once such individual that continues to serve and is in Afghanistan as of this writing is my brother-in-law Captain Brain Huysman who is the Company Commander of Weapons Company: 1st Battalion, 5th Marines (http://www.i-mef.usmc.mil/external/1stmardiv/5thmarregt/1-5/subunits/subunits.jsp). On this day and every day I salute you Brian and all that serve in our military that continue to protect our nation. Thank you.

So on this 10th Anniversary, I reflect on something that changed our nation forever and I too will "Never Forget."

Tuesday, September 6, 2011

September MSDN Webcast Training For Newbie ASP.NET Developers

If you are just getting into .NET and specifically ASP.NET, then the following (2) MSDN Webcasts would be worth attending. They are free, so search and check the site often for other topics that interest you as well. The (2) below are level 200 webcasts that are geared for new ASP.NET developers.

MSDN Webcast: ASP.NET 4.0 Soup to Nuts (Part 1): Introduction to ASP.NET (Level 200)

MSDN Webcast: ASP.NET 4.0 Soup to Nuts (Part 2): Website Basics (Level 200)

Wednesday, August 31, 2011

Help! My ASP.NET page is generating a JavaScript "Object Expected" Error Now That I Am Using jQuery, Plus A Little On URLs In ASP.NET

So you are all excited and just got into this jQuery thing! You build your code, run the ASP.NET site, and IT IS SO Cool...wait. You look down and see a JavaScript error in the status bar of the browser indicating the following:

"Object Expected"

Well let's begin by stating this is about a generic error message as they come and there could be 1 million different reasons for it. However if you just got into writing jQuery and are running into this error, then odds are you have not properly referenced the jQuery scripts for your application to use. I hope at least you know there are scripts that must be incuded. If you are thinking "No I didn't know", then you need to go back to jQuery 101 videos on setup.

However getting the scripts properly added to your ASP.NET application does have some nuances which make it easy to mess them up. The most common pitfall is if you have a ASP.NET site that uses a MasterPage. If this is the case, then your content pages are probably not adding the scripts individually, and the most appropriate place to register them in in the MasterPage's <Head> block.

You have (2) main options for referencing the jQuery scripts: download the scripts and include them with your project or from a CDN (Content Delivery Network) (i.e. Google or Microsoft). The upside to using a CDN is you do not have to worry about downloading the scripts into a folder and then finding that perfect path in the MasterPage to reference them. The downside is if you were working in an Intranet environment and outside access was limited or denied, then you would not be able to dynamically access those scripts.

Regardless, the 1st step in seeing if the original error described above is caused by improperly added scripts, let's go ahead and reference the jQuery scripts from Microsoft's CDN like displayed below:
<script src="http://ajax.aspnetcdn.com/ajax/jQuery/jquery-1.5.1.js" type="text/javascript"></script>
If using the script reference from the CDN above fixed the issue then great! If you want, you can leave it like that and be done. If you still want to download the scripts and have them within your project to be referenced, then we have to dig a bit deeper as to the referenced path you use for the scripts.

Odds are your jQuery scripts are in a folder named 'Scripts', your pages in another folder named 'Pages' and maybe you have multiple levels of organizing your code files making it difficult sometimes for the proper path to be resolved. One of the BIGGEST pitfalls I see is using the Intellisense dialog when pressing the "=" sign after 'src' in a tag and navigating to the files/scripts manually. Well you would think VS.NET would give you the proper path, correct? Not always. In fact it will use a dot-dot notation (../Path/File) which seems proper, but at runtime does not resolve correctly.

In VS.NET there are going to be a few ways you can reference a path to a file and this is where things get confusing sometimes. Let's look at the (4) main ways to reference a path from the page's source:

(1.) use a relative path: using a series of backslashes "\" you can provide a path in reference or relative to your current location.
<script src="/Scripts/jquery-1.4.4.js" type="text/javascript"></script>
(2.) 'dot-dot' notation: this indicates, "Navigate up to the parent directory" from the path provided.
<script src="../Scripts/jquery-1.4.4.js" type="text/javascript"></script>
(3.) tilde (~) character: this represents the root directory of the application in ASP.NET. The caveat is it can only be used in conjunction with server controls *not* script tags (without some server-side code help shown below). This method is not going to work well by default.
<script src="~/Scripts/jquery-1.4.4.js" type="text/javascript"></script>
(4.) ResolveURL (System.Web.UI) method: This is a server-side command to convert a URL into one that is usable on the requesting client. Notice the use of the server-side code escape tags so this method can be called. This is the method I prefer and dynamically resolves the URL to the proper path. I recommend using it if you are going to reference local project script files.
<script src='<%# ResolveUrl("~/Scripts/jquery-1.4.4.min.js") %>' type="text/javascript"></script>
My recommendation is to either reference the scripts from a reputable CDN like Google or Microsoft, or use Option # 3 above with the 'ResolveUrl' method. This will ensure your custom JavaScript and jQuery files are properly registered with your ASP.NET application.

There are some good resources for explaining how to resolve path's in MasterPages and in traditional pages. Below I have included some links if you would like to investigate further or bookmark for reference.

Avoiding problems with relative and absolute URLs in ASP.NET

URLs in Master Pages

Directory path names

Microsoft Ajax Content Delivery Network

Wednesday, August 24, 2011

Asynchronous Programming In .NET Is No Longer 'The Big Bad Ugly'

Let's face it, the word 'Asynchronous' still conjures up thoughts of low-level multithreading challenges and words like 'mutex' and 'deadlocked' for those of us that have been developing long before the world of .NET and even early on in the day's of .NETs inception. However, no longer should this fear or concern be so prevalent like it was in years past.

Why? Well the good folks in Redmond have added so many layers of abstractions atop of the System.Threading namespace and on Asynchronous programming techniques in general, that the developer no longer needs to know how every gear under the hood works anymore. These abstractions of Asynchronous processing have evolved in many different forms including but not limited to 'Asynchronous Delegates' (Framework 1.1), 'Background Workers'
(Framework 2.0), 'Asynchronous Lambdas' (Framework 3.0 C#), 'PLINQ' (Framework 3.5), 'TPL' (Framework 3.5), and now the 'Async Framework' (CTP). All of these abstractions have a similar theme: allow the developer to quickly and efficiently create processes that execute concurrently with typically less code and a smaller chance for failure caused by improper coding that could occur when manually spawning threads attempting to achieve the same outcome. What's the result? The same one that a race car driver has when he steps into a car he didn't build himself: he doesn't need to know every detail of how the engine or car was built, but just how to drive it and finish 1st! Now it's not to say that basic or even mid-level knowledge of how these asynchronous processing abstractions (as I like to call them) are not required. In fact, if you go beyond just scratching the surface of simple asynchronous programming, the knowledge is important on how to proceed to more advanced topics and methods available. However, this still is far from the requirement of understanding everything about spawning and managing your own system threads.

One of the main draws to harnessing the potential of asynchronous processing now more than ever is the advancement in hardware that has occurred in the last 5 years. You might still have a dinosaur PC at home with a single core CPU, but odds are you have 2,4,6, or even 8 cores on your newest machine (like the 8 I have on mine, thank you Intel I7 -> read here:
My New Computer: A Developers Dream) and have bandwidth to spread processing out among available cores. This basic knowledge of the number of cores or threads available in your environment where the application will be run, can help you decide on which technique to use or if the processing time will actually be reduced. However it is most likely that your environment has at least a dual-core CPU and bandwidth available to run some processing asynchronously. The end result will be you can look like a hero in a few lines of code by running long running or redundant tasks concurrently with a relatively small understanding of all of the true complexities involved in multithreading and asynchronous processing.

So for now, I will leave this discussion here and going forward will have several posts aimed to introduce or familiarize you with using some of these asynchronous programming techniques available.

Friday, July 22, 2011

Visual Studio Live! is coming back to the Microsoft Redmond Campus, October 17-21

5 days of practical and immediately-applicable training for developers, programmers, software engineers and architects in Visual Studio, Silverlight, WPF, .NET and more. And it all takes place on the Microsoft Campus in Redmond, October 17-21! Check it out at: http://tinyurl.com/3bn4by9

If you are a .NET Developer I
highly recommend any of the VSLive! conferences, and where better to be then in Redmond with the gang from Microsoft.


Get the MSDN Magazine for a Reduced Price

I am not sure how long this promotion will last, but check out the link below to subscribe to the MSDN magazine at a reduced 20% off price:

MSDN magazine at 20% reduced price

If you have a MSDN subscription, then you already qualify to get the magazine. Just log onto your MSDN account and fill out the required information to get the magazine as part of your paid MSDN subscription.

Wednesday, July 13, 2011

Debugging Code Techniques In VS.NET 2010

OK so you have a problem in code either during development, testing, or production and do not know exactly how it is occurring. What do you do? For those of you that are thinking your code does not have problems or there should never be problems in the 1st place, please click here. For the rest of us in the real world, you might be thinking about a new tool like 'Intellitrace' to track down exactly when the error occurred. But not everyone has that environment created and even with using it, you still need to figure out *why* it occurred. How do we do this... DEBUG the code!

So now a lot reading this might think, "Well yeah I know all about debugging, simple stuff." That may be all and true but it surprises me how many developers out there based on questions I see asked a lot from an array of environments only know (2) buttons on the keyboard when it comes to debugging: [F10] and [F11] (Step Over & Step Into with default key mapping). Oh yeah and [F5], Start!

To be good at debugging and playing detective to track down problems or anomalies that cause problems, Microsoft has provided us with a plethora of debugging options within VS.NET. Most of the techniques have been around for multiple versions of VS.NET and *some* of the techniques still not known by a faction of developers stretches all the way back to the old VB Visual Studio IDE.

So let's review the (3) most basic debugging techniques: Step Into [F11], Step Through [F10], and Step Out [Shift + F11]. Step Into [F10] will execute each line of code, going into any method, property, etc. call. This is the most granular way to trace each line of code. Step Through [F10] will *not* go into code that makes up a property, method, etc. and rather execute that code completely without executing line by line, returning control to the developer to debug the next immediate line of code after execution has completed. The last one I mentioned, 'Step Out' [F11] is one I find under used even though this is functionality that stretches back to VBA and VB6 (ever watch someone hold down the F10 key or press it like they are tapping on a snare drum to exit out of a method?). What this does is allow the developer debugging to exit out of the method immediately allowing control to be passed back to the next line of code
after the calling code to the current method was made, but still completes execution of the current method, property, etc.. This works well for the following example - let's say you have a method you are debugging and it is 50 lines of code. You need to understand what is happening between lines 5-10 and the rest is not important for what you need to know. What you would do is press [F11] to step into the method to debug and gather the information needed, but once you were finished observing lines 5-10 you want to return execution back to the caller but yet finish execution of the current method. You can do this by 'Stepping Out' of the routine by pressing [Shift + F11]. A lot better than placing a break point the line after the caller and pressing [F5] or trying to press [F10] another 30x to finish the method.

This really so far is super basic stuff and hopefully a bore or quick review to any intermediate or seasoned developer. But you know as well as I that the hard to track down issues, 'anomalies' happen all too often and there are a lot of other ways to debug and track down issues. One way I discussed previously is by using conditional breakpoints which I talked about in the following post:
How to: Set a conditional breakpoint in VS.NET Ever press [F5] over and over hovering over a single variable value until the last name is 'Smith' or the value is 'x'? Well setting conditions on breakpoints to only stop execution when that condition is = True is well worth reviewing.

There are also several 'helper' tools that go along with debugging to help make the debugging process more efficient. So let's begin with a few tools to help with debugging. The 1st is 'Debug Labels'. Labels on debug points are useful to define descriptions or add attributes to help with individual breakpoints to provide information about it. This will carry over and be quite useful when exporting breakpoints as I will show next. So to begin, bring up the breakpoints window. The easiest way to do this is to press [Ctrl] + [Alt] + [B] on the keyboard. The window below shows this:


The Windows shows all active breakpoints and provides several sorting options and customizable features for breakpoints directly in the window. I will not go through them all here, so take a look and explore yourself. One
very important feature to take note of in this window, is that any action you select to preform on the breakpoints will only be carried out on the actively displayed breakpoints as a result of any searches you have made. So If you have 10 total breakpoints, and preform a search that reduces the list down to 3 breakpoints, only those 3 in the search results will be acted upon. To clear any search criteria, press the 'X' to the right of the 'In Column' selection list.


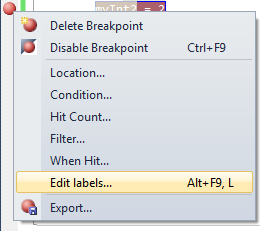
In the block of code above I have set (2) breakpoints and notice they both display down in the Breakpoint Window displayed previously. What I want to do is create a label and assign it to this breakpoint. There are (2) ways to do this: either right click the breakpoint in the code editor or in the Breakpoint Window to bring up its options Window and select '
Edit Labels...'


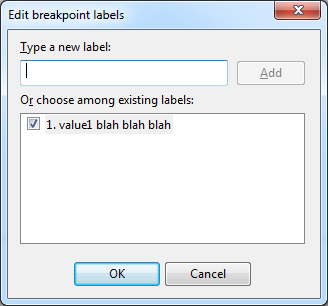
To add a label, type in a description or attribute, and press 'Add' as shown below. There is a 64 character limit, and you can not have commas. You can add as many label descriptions through the window at a given time, and assign as many labels as you want signified by the checkbox(s) selected to the left of the requested label(s). These labels
will be available for assignment to other breakpoints as well:


Once a label is created it can be assigned to 1..n breakpoints. Maybe you have a set of breakpoints that are similar and all need the same label. Another possibility is you have some sort of numeric order description. In this case the sorting ability in the Breakpoint Window is nice. Just sort the column to get the label description in order. This can help with a set of imported breakpoints or for walking through your own defined breakpoints. From this window you can search through the breakpoint labels as well. Just change the '
In Column' value to 'Labels', and type in the search criteria. The list will filter down based on the search results.


The next feature available from the Breakpoints Windows is the ability to Import and Export the breakpoints. Have you ever had that app you get out of source control and think "
Ok I need to place (x) # of key breakpoints here, here, and here to do some task." Well what you should be doing is exporting your breakpoints and saving that file in source control. This is also really useful to pass along to other developers that might be working on your project. How nice for them to have descriptive (labels) pre-defined breakpoints already defined for debugging. The task is trivial: just press the save disk icon from the Breakpoints Window and the debug breakpoints will be exported to an .xml file. The import is just as simple. Just press the Import icon and select the .xml file where the breakpoints are defined. Don't forget to add these files to Source Control.


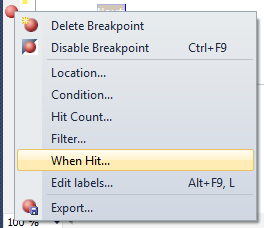
The next debugging technique helps with monitoring specific values but not having to stop execution to do so. They are called 'Tracepoints'. Have you ever been in a situation where you need to monitor a value of a variable and began writing 'Debug.Writeline' statements? Errrrr, No. Just use a tracepoint and monitor the same Output Window. This way you don't have to clutter up your code with debugging lines that later you might clear out or have to wrap in conditional #Debug statements. To create a tracepoint right-click on the actual breakpoint in the code editor or from the Breakpoints Window and select 'When Hit...'.


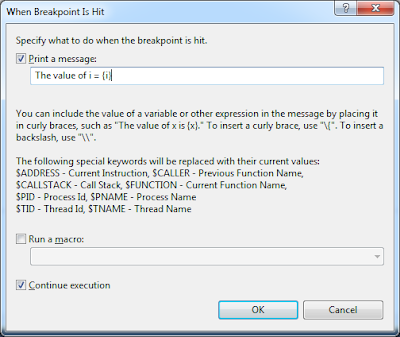
This will bring up a dialogue that allows you to type in some expressions to output needed information.


For example look at the following basic loop below.
For i As Integer = 1 To 10

Next
I want to place a tracepoint on the variable to see it's output in the loop. The expression I will use is as follows:

The value of i = {i}

In my case I will leave the option checked to 'Continue execution', so I can view the output, but not have to stop execution. Notice after adding the expression your traditional breakpoint is now a tracepoint which is displayed as a diamond.


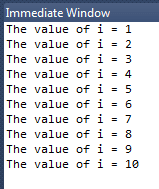
Before executing the code, make sure to have the 'Command Window' present. If it is not, you can access it by pressing [Ctrl] + [Alt] + [O]. Now execute the code that will run through the configured Trace Point. Notice execution will not halt, but the expression you provided will be output to the Command Window. Notice for the simple loop, it output all of the values.


Pretty nice and all done through a tracepoint. No need for custom logging, Writeline statements, etc. This is an especially good technique for watching values during their lifetime throughout an application and helps solve the old "I swear I clear that value out...", or "Why does that variable loose value here but have value over there...', and many, many more examples.

The last (but by
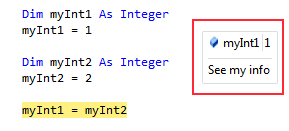
far not the last available technique) topic I am going to cover are 'Pinned Data Tips' while debugging. Ever hover over a value and have to remember it for later in execution, or jot down some notes about a particular debugged line of code? Well this feature is for you then. Begin by placing a traditional breakpoint on a line, and being execution of code until the breakpoint is hit. When you hover over the variable you will get it's current value. Ever notice there is a push pin on the end of the value? Yeah, go ahead and press it as displayed below.


To move the data tip around, just click and hold the pin to drag it off to the side if needed where there is more white space. You can also add comments to that data tip. Just press the down arrows, to get a text box for typing brief comments.

Notice as execution continues, or when you being a new debugging session the pinned data tip is still present! How cool, no more stickys on the screen or desk with random notes, values, etc. Notice how you will see it displayed as a blue horizontal push-pin in the pane where breakpoints are assigned in the editor. If it is on the same line as a breakpoint it will be mostly hidden.

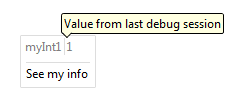
As mentioned, once you being debugging again (even after stopping execution), you defined push-pins will reappear but there is one more useful added feature. Notice how the push-pin will display the
last debugging session's value. This can be really useful to see how the code reacts to different input possibly, and doesn't require you to keep track of what the value was from the last time code ran through this breakpoint. The last value is displayed below:

Note: to clear any data tips, right-click the push-pin in the code editor and select 'Clear'.

These debugging techniques are just a small sampling of all of the available features. Feel free to add comments for any other features you find useful as well. The main point to drive home is that to be successful in software development will at one time or another require 'playing detective' and tracking down unknown issues, anomalies, or maybe just learning how code behaves line by line. To do these tasks well you have to be efficient at debugging. So if you are one of the few that admits they only knew about (2) or (3) Function keys used for debugging, try some of these and many other documented debugging techniques to help you expand your problem solving abilities in VS.NET.

Tuesday, June 28, 2011

Create A Self-Signed SSL Certificate Using IIS 7

If you are a .NET developer that creates IIS or self-hosted WCF services, then you will probably have the need at some point to secure the transport with a SSL certificate if using a http binding type. If you have a WCF service hosted by IIS, applying a SSL certificate is a bit more trivial because the endpoint configuration does not dictate the URL. The virtual directory in IIS will create the URL for your endpoint. However, if you are hosting your WCF service in a Windows Service, you dictate the endpoint and applying the SSL certificate is a little more involved. Because of this you may want to create a self-signed SSL certificate while still in development to ensure that your 'https' endpoint works correctly. With IIS websites, legacy .asmx services, or WCF hosted services, applying a SSL certificate happens after the fact via IIS and the initial testing with a SSL certificate may not even be desired. Regardless of your situation, the following tutorial shown you a simple procedure to create a self-signed certificate on your local machine.

So what is a self-signed SSL certificate you may ask. A 'CA' or Certificate Authority is a trusted provided to generate a SSL certificate. Your local machine is a CA, but unfortunately and as expected the CA on your machine is not trusted (as should be) by any outside party, so any SSL certificate generated locally is good and trusted just there: locally! To get a SSL certificate generated by a trusted CA, you need to go to a commercial provider like 'GoDaddy' or 'Verisign' and purchase a SSL certificate. These Certificate Authorities are trusted on the internet and are able to provide SSL certificates with a set expiration time (i.e. 2 years out). Once applied, you can view the SSL certificate information of a secure site by pressing the secure lock icon in most browsers next to the URL, and will see who issued the SSL certificate, its expiration, and other public details like the public key.

If you happen to be on an Active Directory domain doing 'intranet' or internal software development, you may have a CA on the domain that will issue certificates which will be trusted within the domain. This is the way to go so one does not have to buy a GoDaddy or Verisign SSL certificate for every internal WCF service or hosted ASP.NET site. Check with your server folks (unless that's you!) to see if there is a CA that issues SSL certificates trusted by all on the domain.

If you don't have IIS7, generating a SSL certificate is still possible. You just do the similar steps under the 'Directory Security' tab in IIS for a given site. Using IIS to create the certificate does not mean we have to host our service in IIS. It just has a convenient 'wizard' style interface to generate certificates and place them in the proper 'stores'. You can manually decide which stores your certificate is placed in and trusted by using the Certificate Manager MMC snap-in. That is really off topic for this post, but good to see how local and purchased certificates are managed. The snap-in is not under the administrator tools by default so look to the following link if interested in adding or accessing this MMC utility:

How to Add Certificate Manager to Microsoft Management Console

To begin a new certificate request, open IIS7 and click on the root element which is your machine or server node. Locate the 'Server Certificates' icon and double click it:

On the right-hand side of the screen select the 'Create Self-Signed Certificate' link which will display the following dialog:

This is the important part which is dictating the friendly-name of your certificate. For local WCF development you really have (2) choices: name the certificate 'localhost' or the name of your machine. I recommend the name of your machine as it is more explicit. So in the example below my machine name is 'DevMachine1234'. The name is important for hosting WCF services and applying a SSL certificate to the exposed endpoint. If the SSL name does not match the domain of the hosted service it will not work. In the case of local development, name the certificate the same name as your machine.

After completing the request you will see the SSL certificate has been generated by the local machines CA, the friendly name, and the certificate hash.

The hash value will be important in the next post about applying this self-signed certificate to a port number that is dictated in the WCF configuration for a service hosted by a Windows Service. If you are applying the SSL certificate to a IIS hosted service or site, all you have to do is select it from the dropdown when configuring the 'https' binding in IIS7.