Showing posts with label TypeScript. Show all posts

Monday, November 7, 2022

Overloaded Methods in TypeScript

If you've ever worked with a language like C# or Java you're probably often using overloaded method signatures to provide callers with an opportunity to have a similar outcome by passing a different number or type of parameters. However in TypeScript which is just a superset of JavaScript and adhering to all things JS under the covers, method overloading doesn't work the same with identical method names and parameter signature because there are no types to differentiate between. If you have (2) identical methods in JS being called the latter defined method on the prototype will be called, and the former ignored.
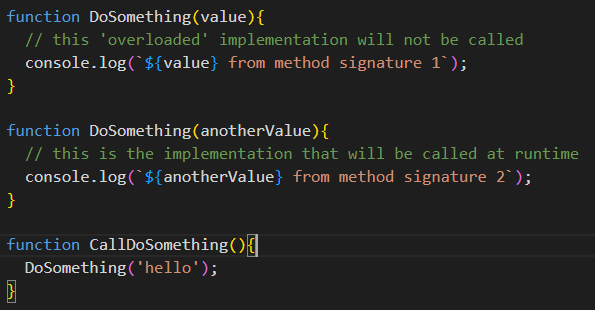

TypeScript has the benefit of type definitions at build time so method overloading is possible... kind of. If the goal is to have intellisense to see multiple definitions of the same overloaded method, we can certainly achieve that. If the goal is to have multiple definitions of the same method name with different parameter signatures and separate, different implementations, this out of the box is not possible and won't be like traditionally static typed, structured languages like C#. Regardless let's see how overloading does work in the vanilla form (I'll hint at conditional types at the end) using TypeScript and you can decide if you can leverage for your benefit.

The recipe for overloaded methods in TypeScript is that you can create 1...n method signatures, but only have a single implemented method representing any of the possible call combinations. Let's look at a code sample:
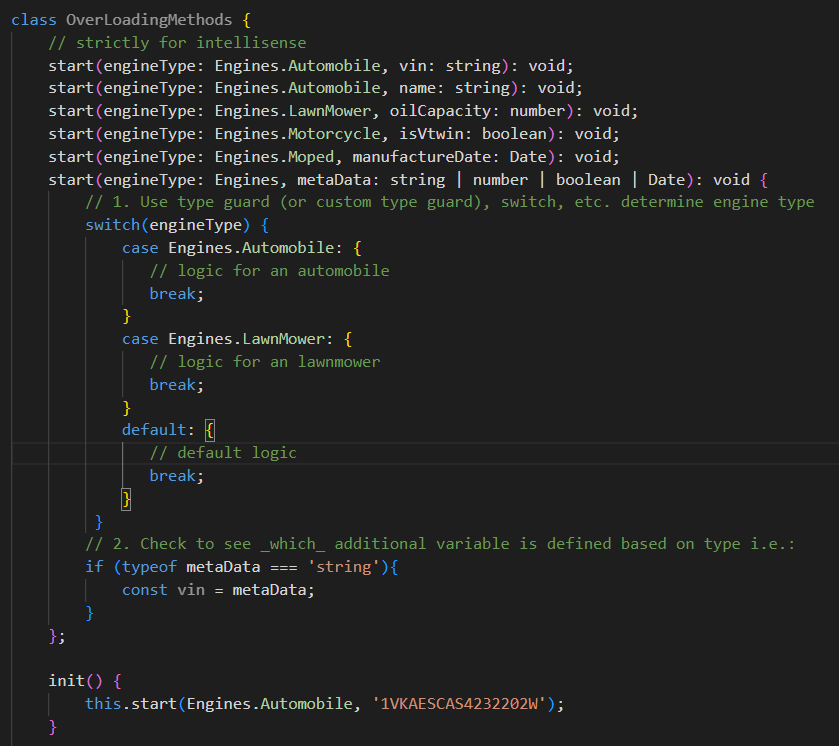
Above we have the overloaded method named start, that represents the potential to provide the different procedures to start an engine, based on the various engine types. Note the (5) overloaded method signatures, but only a single implemented method. The reason for this is the overloaded behavior and differentiation of methods is a design/build time only feature available due to the fact we are using TypeScript. In fact if you look at the transpiled JavaScript the only method shown is the single implemented method:
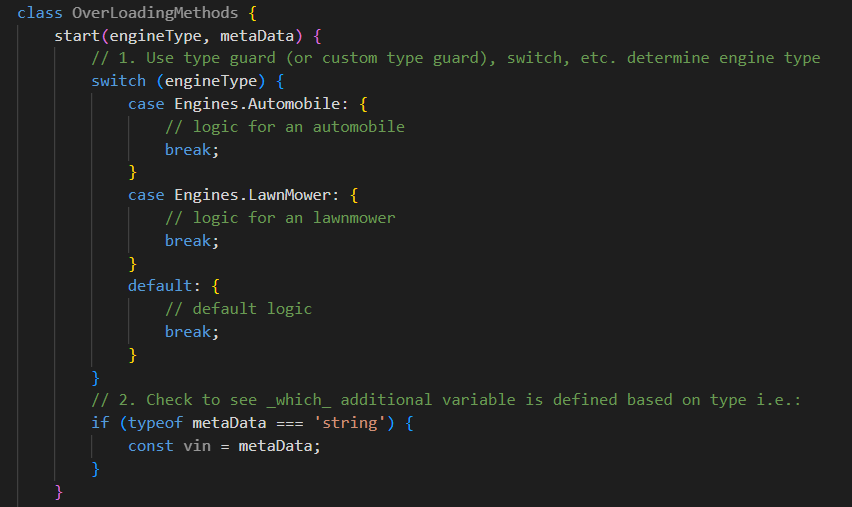
If you do try and use implementations on more than 1 method with the same name, TypeScript will warn you with a, "Duplicate function implementation" warning.

Looping back to our original goal using the properly implemented code, as the method caller if we want to see at design time a list of the various signatures, we have indeed accomplished that goal as you may scroll through and see the multiple, overloaded definitions:

However this comes at a bit of a sloppy cost for that single implemented method. In order to make this work the method signature must encapsulate all potential values that could be sent to satisfy the TypeScript compiler. This usually equates to using a Union type in the method signature to account for all possible types. The next hurdle is because overloaded methods are really a façade, you must manually pick apart what's sent and reverse engineer what you received at runtime. This usually equates to type guards, if statement, switch statements, or some combination to sniff out what you received, so you can proceed forward. All of this logic is that code above within our implemented method to determine what exactly we received.

It's even trickier to determine what's sent if you have (2) identical method signatures that are only differentiated by variable name like our 1st two methods below. This is not advisable even though it does work:

The long and the short of method overloading in TypeScript is that it is possible, but with a few caveats that may not make it sensible. I think if you only have (2) different method signatures, that are easily discernable at runtime in the implemented code, then this might make sense. However as the signature list expands, the logic to differentiate the potential values sent can get unwieldly. 

Lastly another potential option may be to use conditional types in the method signatures which rely on generics to sort out the types based on what the caller is sending. This could reduce the need for the implemented method to contain all the logic to sort out which values it was sent as it will be know already. However in this post I wanted to strictly do a 1:1 look at the concept of overloading as it may be known from other languages, and how it can be accomplished in TypeScript.

Friday, December 20, 2019

How to Prevent Visual Studio from Compiling TypeScript

If you are building a Single Page Application / JavaScript Web application using Visual Studio, you've probably already run into the overlap between tooling that surrounds npm and the tooling within Visual Studio. As web development moves further away from the bells and whistles needed from the IDE (unlike heavy server-side web technologies like ASP.NET MVC that are heavily dependent upon the IDE), separating a project from these 'features' can be not quite straight forward. While the practice of using Visual Studio for modern web development isn't as prevalent these days with much of the coding taking place in streamlined IDEs like Visual Studio Code, there are still a lot of projects that exist and have a hard time decoupling from Visual Studio, MSBuild, and ASP.NET because of their coupled nature. This process will help in this interim stage while the code is still fully integrated and run from Visual Studio.


One of these tasks is preventing Visual Studio from being responsible for building TypeScript and allowing your tooling (i.e. Webpack, Gulp, Grunt) to be in charge instead. The idea here is that your tooling has been configured to lint, minify, build, concat, bundle, copy, whatever all of your project files exactly as you desire. At this point you don't really need MSBuild involved in transpiling your JavaScript to TypeScript as it would be redundant and often times problematic. To prevent Visual Studio from doing any compilation of TypeScript preform the following steps:

1. Ensure a tsconfig file is added to the project and configured correctly

TypeScript and any build process you are using will work together based on the configuration in tsconfig.json. This file can be hand-rolled from scratch, or may have been generated for your project from a process like ng new and the Angular CLI. You can also generate a default tsconfig file (recommended approach as opposed to creating from scratch) using the following command:

tsc --init

This will generate a default configuration file for TypeScript compilation. Your web-client's code build process will need to point to this file and using it as a driver for the TypeScript compilation behavior.

2. Modify the .csproj project file to prevent TypeScript from compiling

Within Visual Studio, right-click your project and select the option to edit the .csproj file. These options are in a XML format and the following needs to be added:

<PropertyGroup>
   <TypeScriptCompileBlocked>true</TypeScriptCompileBlocked>
</PropertyGroup>

If you still want MSBuild to handle your TypeScript compilation there are several options that will change the behavior: 


One of the only primary use cases I can think allowing MSBuild to handle TypeScript compilation is for using TypeScript independently of a framework/app like Angular or React when using standalone in an ASP.NET MVC application. Otherwise the native build processes of your front-end stack are much better off being used to build TypeScript as opposed to MSBuild.

Monday, April 1, 2019

Using Quokka.js for Real-Time Feedback in TypeScript

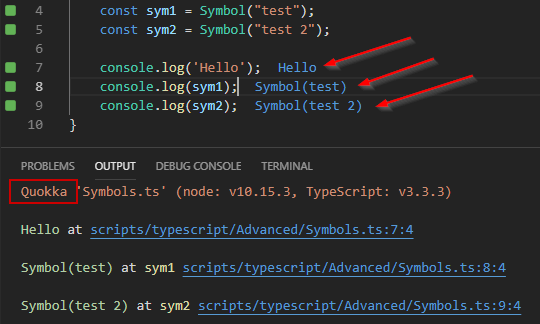
I'm always looking for cool VS Code extensions and Quokka.js certainly hits the spot. It provides real-time feedback on JavaScript and TypeScript directly in VS Code in a variety of forms. For example if you're testing some code via console.log, you can get the output directly inline to the right of the code which is awesome.

Once installed, all I needed to do was open the command pallet in VS Code (Ctrl+Shift+P) and select, 'Quokka.js: Start on Current File' as shown below:


After initiating the extension, as seen below I was getting live logging directly in the code.


If there's a value not provided in the scope of the file, Quokka.js obviously can't produce an output and this was expected behavior:


There is quite a bit more functionality offered like code coverage assessment (as it pertains to code execution paths, not unit testing), and a provided value explorer. There is also a Pro edition with additional tools available.

Check out the links below to get started:

Quokka.js
VS Code Extension for Quokka.js

Wednesday, January 30, 2019

I'm excited about WebAssembly, but not as much about my beloved .NET, Blazor's implementation

As a web client developer these days, I'm sold on WebAssembly and looking forward to it's adoption by the multiple languages that can compile to it. However interestingly one of the things I'm beginning to feel is my personal dislike for the Blazor syntax and implementation. I suppose my multiple years being entrenched in JS/TS with really enjoying TypeScript + the SPA frameworks that have a relatively clean separation of markup (declarative) and logic (imperative) has made me have a bit of dislike for lacing the view directly with imperative view logic like this in Blazor:

@page "/myorders"
@inject HttpClient HttpClient

<div class="main">
</div>

@if (ordersWithStatus == null)
{
  <text>Loading...</text>
}
else if (ordersWithStatus.Count == 0)
{
  <h2>No orders placed</h2>
  <a class="btn btn-success" 
        href="https://www.blogger.com/2404">Order some pizza</a>
}
else
{
  <text>TODO: show orders</text>
}

As a side of humor, to format code blocks on this blog I have to select a 'brush' for the language formatting. Case in point, in the above snippet I wasn't sure if I should have picked HTML, C#, or Blazor.

This is probably because I was never a fan of the classic ASP, MVC Razor, or even Blazor implementations where view logic is interlaced with the markup (for web client code I'd even throw in JSX - as explained here). This doesn't matter a pile of beans really because this is all subjective and has absolutely no bearing on how successful Blazor or any other language targeting WebAssembly will be. I actually love the .NET stack and was carved from that block since the beginnings of my professional career, but I just don't like that particular style of implementation for the web. Shoot for all of ASP.NET's webforms shortcomings, the view overall was relatively clean (keeping logic in code separate from the markup) and pure aside the fact the tags may have been ASP.NET server-side controls but still took the shape of HTML tags (analogous in form to today's custom HTML elements).

I also do not like the JSInterop style in Blazor. You can invoke JavaScript functions from within C#, and that alone is handy I suppose, but messy. The functions you want to invoke must be available on the global scope of windowYuck. JavaScript scope and encapsulation was difficult enough to manage through the years, I'd rather not go back to the days of hanging code off the window object making everything globally available. In 100 level examples this seems fine, but get to 10's or 100's of thousands of lines of code in an enterprise app and this could get ugly.

<script>
  window.MyFunction = (someValue) => {
    //JS code here...
  };
</script>

using Microsoft.JSInterop;
public class JsInteropExample
{
  public static Task MethodName(strings someValue)
  {
    return JSRuntime.Current.InvokeAsync("MyFunction", someValue);
  }
}

I'm probably not alone in my opinions, and that's why I'll be keeping an eye on the ability to use TypeScript as a target for WA. I like JS/TS and am comfortable with it for developing web applications. I feel many client side developers may have a similar sentiment and not want to either learn a server-side language, or just prefer the front-end languages they've been using for years. TS on it's own won't be enough (it's just a language), so it would have to be TS + some web framework (??) and we'll have to wait for the pieces to come together.

To that end I'll keep an eye on things like assemblyscript which is a TypeScript to WebAssembly compiler. It doesn't appear to have the traction some of the other compilers do at the moment, but I'm sure it or something similar will gain momentum as WA picks up and the masses of web developers may not feel like using C#, C++, or Rust.

AssemblyScript: a TypeScript to WebAssembly compiler

AssemblyScript: Status and Roadmap

I'm not counting Blazor out for sure, and it's still going to evolve as it's only an experimental project at the moment. I really enjoy developing in C# so it seems like a great match, but in it's early stages it's rough around the edges and maybe that's just my opinion that's shaped as a front-end developer. I'm pragmatic and will not count out the usefulness of developing on a single-stack and this is where Blazor shines for .NET developers. 

I'd be interested in feedback or thoughts about using TypeScript to transpile to WebAssembly or anything else along these lines, so please feel free to leave a comment and let me know.

Friday, September 28, 2018

Named vs Fat Arrow Functions in TypeScript

When working with TypeScript, it's important to understand some of the key differences between named and fat arrow functions. Let's have a look at a basic class with one of each type of function defined, and also the resulting ES5 that TypeScript transpiles to for a better understanding.

Here is a sample TypeScript class with the two different types of functions.

class MyTsClass {

    private myValue: number = 0;

    myNamedFunction(): void {
        setTimeout(function () {
            console.log(`Inside myNamedFunction, this.myValue = ${this.myValue}`);
        }, 1000);
    }

    myFatArrowFunction = (someValue: number) => {
        this.myValue = someValue;
        console.log(`Inside myFatArrowFunction, this.myValue = ${this.myValue}`);
    }
}

const myClass = new MyTsClass();          
myClass.myFatArrowFunction(1);
myClass.myNamedFunction();

Here is the resulting transpiled ES5 JavaScript.

"use strict";
var MyTsClass = /** @class */ (function () {
    function MyTsClass() {
        var _this = this;
        this.myValue = 0;
        this.myFatArrowFunction = function (someValue) {
            _this.myValue = someValue;
            console.log("Inside myFatArrowFunction, this.myValue = " + _this.myValue);
        };
    }
    MyTsClass.prototype.myNamedFunction = function () {
        var _this = this;
        setTimeout(function () {
            console.log("Inside myNamedFunction, this.myValue = " + _this.myValue);
        }, 1000);
    };
    return MyTsClass;
}());
var myClass = new MyTsClass();
myClass.myFatArrowFunction(1);
myClass.myNamedFunction();

For the purpose of this post, we'll concentrate on (2) main aspects of the code
  1. Where the method is created on the object, and the resulting performance impact
  2. How the this keyword behaves
It's important to understand the differences because there is a performance impact. Notice how the named function on the class is created and attached on the object's prototype. In this manner, the method is stored in memory only one time, as objects created from the same constructor point to a single prototype object. This is the more memory efficient implementation.

Now inspect the fat arrow's function in the ES5 code. Because the method is declared and created in the object's constructor (instance member), it will be declared again per each new instance of this type of object created. This has a memory and performance overhead. As a note, this is the identical resulting behavior to explicitly creating methods within the class constructor in TypeScript.

At this point we might be thinking, "Well that's enough let's just use named functions which will be declared on the object's prototype and be done with it!" There is more than meets the eye and the fat arrow function is quite useful. One of the main advantages is that fat arrow functions lexically capture the context of this in TypeScript. This is critically important in functions that contain callbacks or where re-assignment of instance variables might occur. The former use case is one that we run into often with observable callbacks in say Angular components. You may have run into issues with the this keyword and noticed it wasn't the correct context. The issue is if not using the fat arrow syntax, the context of the this keyword will be undefined. If strict mode isn't enabled, the context of this will be of the window object. If you look in the ES5 tanspiled code, you'll notice this is captured from outside the function body allowing our context to be captured correctly.

var _this = this;

Let's look at the console output from the original code above. Notice in the setTimeout call the use of this. However in this instance it's not the proper context resulting in undefined when accessed. 


The fix is to update the callback to use the fat arrow syntax which will capture the correct context of this

myNamedFunction(): void {
  setTimeout(() => {
    console.log(`Inside myNamedFunction, this.myValue = ${this.myValue}`);
  }, 1000);
}

If we run the code again, we get the console output we expect.


In a TypeScript project with the default configuration of "noImplicitThis": true set in the tsconfig.json file, you'll actually be warned in the IDE of this scenario, " 'this' implicitly has type 'any' because it does not have a type annotation." This would be an indication you need to use the fat arrow function instead.


There are other use cases beyond the ones I'm mentioning here today in regards to the behavior of this with inheritance and calling the parent class as well as other differences. However these are two key areas that should be understood, as I see the usage flip-flop without intent, and developers should be aware of the performance and behavior differences and create the correct type where appropriate. They have separate purposes, so I'm not a fan of just one or the other. Using only fat arrow functions have their performance impact, but shouldn't be avoided all together as they are instrumental on capturing the correct context of this when needed. 

Tuesday, September 18, 2018

Visual Studio Code Snippet - Triple Slash Directive

Sticking with the theme of my last blog post, Running ES6 Modules Native in the Browser using TypeScript, this post looks at pure JavaScript/TypeScript projects (i.e. NodeJS), that might not be using a framework or module loader, yet still need the ability to reference dependencies from other files. We've been doing this for years using the Triple-Slash Directive like the following:

/// <reference path="./src/ts/myClass.ts" />

In Visual Studio Code I was looking for an extension, snippet, or shortcut to type out the above. Interestingly I came up with nothing. Maybe it's inside another extension I hadn't seen, but rather than look for a needle in a haystack, I decided to quickly hand-roll my own snippet. This is trivial to do in Visual Studio Code. Here is the snippet for a triple-slash directive, and it can be used with the following prefix name: "tripSlash"

{
  "Triple_Slash_Directive": {
      "prefix": "tripSlash",
      "scope": "javascript,typescript",
      "body": [
        "/// <reference path=\"${1:path}\" />",
      ],
      "description": "Triple Slash Directive used for declaring dependencies between files when no module loader is used"
  }
}

Monday, August 13, 2018

Running ES6 Modules Native in the Browser using TypeScript

ES6 Modules have a clean and intuitive syntax, and it's nice to know that there is now widespread support natively to use them in the browser. The main drawback to date is that not every browser version dating back supports ES6 modules and thus a module/loader bundler is still required for production applications (only one of many reasons). However it can be a lot of work to spin up Webpack or SystemJS just to throw together a small test application. Another use case might be if building an intranet app in a controlled/known environment using a supported browser. Regardless of the reason here is how you can use ES6 modules natively in the browser using TypeScript or JavaScript. (This post will focus on TypeScript, but you can use plain JS too)

1. Create an ES6 module

A module is nothing more than a self-contained set of functionality, executed within their own scope and not on the global scope. We'll use the export keyword to expose that functionality outside the module, and the import keyword to use that exposed functionality in another module.

export class Person {
    getAddress():string{
        return '123 Pine St.';
    }
}


2. Create another ES6 module importing the module created previously

import { Person } from "./Person.js";
export class ContactInfo{
    getContactInfo() {
        const person = new Person();
        const address = person.getAddress();
        console.log(`The address is: ${address}`)
    }
}

Make sure to note that "bare" modules are not supported. This restriction allows for browsers to scale in the future when using module loaders, and allow "bare" modules to contain special meaning or functionality. This syntax below is not supported and you'll get the following error in the browser, even though the application might build correctly:

import { Person } from "Person";
"Uncaught TypeError: Failed to resolve module specifier "Person". Relative references must start with either "/", "./", or "../"."

The correct syntax is to reference the exact file directly. 


3. Configure tsconfig.json

Configure the module type to be "ES6." Using anything else will ultimately yield in errors in the browser at runtime as the other module types are not supported. 

"compilerOptions": {
    "module": "es6"
  }


4. Leverage the "module" type in index.html

As this isn't a classic script, we must identify the file as being a module using the type="module" attribute. Note you can use the async attribute with modules if desired which will execute the script as soon as possible, without a guarantee of order, and also not waiting for the HTML parsing to finish. There is also no need to add the defer attribute as it behaves like this by default; a module script can't block the parser.

<script src="scripts/typescript/Person.js" type="module"></script>
<script src="scripts/typescript/ContactInfo.js" type="module"></script>


5. Run and check for errors

If you see any errors such as "exports is not defined" or "define is not defined" then you probably have the tsconfig.json configured incorrectly and it's instead transpiling to another module type that is unsupported in the browser (i.e. commonjs, amd, etc..) natively without a module loader. If testing the basic functionality above, upon calling getContactInfo() you should see the output in the debugger.


For a full list of browser compatibility on ES6 module support, see the following link:
JavaScript modules via script tag

If you're wondering about the .mjs module file extension support in TypeScript, see the following discussion on GitHub: Support '.mjs' output

Monday, January 15, 2018

Strict Property Initialization Checks in TypeScript 2.7

The upcoming version 2.7 release of TypeScript has a new compiler option available named "strictPropertyInitialization" This when set to true causes the compiler to ensure all properties in class instances are initialized. If they are not, a compiler error will be generated upon building for each uninitialized property.

As an aside, to get the most current version of TypeScript installed that hasn't yet been officially released you can run the following npm command:

npm install -g typescript@next

This installs the most recent nightly build which will allow me to have access to the new compiler option:

+ typescript@2.7.0-dev.20180113

If you are beginning a new project, wait to initialize your TypeScript project until after the newest version is installed, so you can easily see all the new compiler options. You can also add them manually to your existing tsconfig.json file. Upon initializing a fresh tsconfig file (tsc --init), you will see the new strictPropertyInitialization check:


/* Enable strict checking of property initialization in classes.*/
"strictPropertyInitialization": true, 

To test this, let's use the current simple TypeScript class:

class Person {
    firstName: string;
    lastName: string;
    address1: string;
    address2: number;
}

With "strictPropertyInitialization":true set, the following compiler errors will be emitted upon building:

error TS2564: Property 'firstName' has no initializer and is not definitely assigned in the constructor.
error TS2564: Property 'lastName' has no initializer and is not definitely assigned in the constructor.
error TS2564: Property 'address1' has no initializer and is not definitely assigned in the constructor.
error TS2564: Property 'address2' has no initializer and is not definitely assigned in the constructor.

This is exactly what we would expect. One way to satisfy the check we can do is mark the parameter as optional using the ? as we might with address2. This will remove the error related with this field, as undefined is acceptable:

class Person {
    firstName: string;
    lastName: string;
    address1: string;
    address2?: number;  //Optional field, type includes undefined
}

The build now only generates 3 errors:

error TS2564: Property 'firstName' has no initializer and is not definitely assigned in the constructor.
error TS2564: Property 'lastName' has no initializer and is not definitely assigned in the constructor.
error TS2564: Property 'address1' has no initializer and is not definitely assigned in the constructor.

To satisfy the strict property initialization for the rest of the class, we can initialize the remaining properties and we will get a successful build:

class Person {
    firstName: string = "Allen";
    lastName: string = "Conway";
    address1: string = "123 Main St";
    address2?: number;
}

There is also a way if needed to individually suppress the property initialization checks on an individual basis. This can be done by including a definite assignment assertion using a ! mark immediately after the property name. This will allow the following to build successfully:

class Person {
    firstName: string = "Allen";
    lastName: string = "Conway";
    address1!: string;  // Suppress strict initialization check
    address2?: number;
}

Visual Studio Code Error with TypeScript Project: "Option 'project' cannot be mixed with source files on a command line"

If you create a TypeScript project in Visual Studio code in a path that contains spaces, you might end up getting the following error after configuring your build task and building the application:
> Executing task: tsc -p "c:\Projects\Test Harness Applications\TypeScript\MyTypeScriptApp\tsconfig.json" <
error TS5042: Option 'project' cannot be mixed with source files on a command line.
The terminal process terminated with exit code: 1
Notice the path I used to create the application contained spaces: 
"c:\Projects\Test Harness Applications\TypeScript\MyTypeScriptApp"

After a little digging I found this GitHub open issue: https://github.com/Microsoft/vscode/issues/32400. The good news is according to the information within that link, this is in process to be fixed in an upcoming version of Visual Studio Code (currently 2/2018). In the interim the solution is just to make sure the full path to your application does not contain any spaces. I verified that by doing this, the compiler issue will go away, and the project build successfully.

Thursday, September 21, 2017

How to Import RxJS in Angular Using ES6 Style Imports

Upon building any type of Angular application, you'll eventually need to make a HTTP call and will do this inside of a Provider. The following code illustrates a barebones use of the Http service in Angular for making a call and mapping the response to an Observable.

return this.http.get(apiUrl)
    .map((response:Response) => response.json())
    .catch((error:any) => Observable.throw(error.json().error || 'An error occurred'));

In order to use this code which is based on the ES.Next Observable, you'll need a library like RxJS to use it in your application. Since many IDEs are poor at letting you know exactly which artifacts need to be imported, you'll probably do a Google search and end up with the following:

import 'rxjs/Rx';

The problem with the above is that imports all of RxJS and that is a huge library. The bottom line - don't do that. The proper way is to import the exported Observable, and any operators needed like below:

import { Observable } from "rxjs/Observable";
import 'rxjs/add/operator/map';
import 'rxjs/add/operator/catch';
import 'rxjs/add/operator/toPromise';  //Only needed if wrapping in a Promise to return

However, notice the inconsistency in the import statements. Can't we just import using the following ES6 syntax for everything?

import { member } from "module-name";

In order to explain this, we must understand that there are different ways to import modules using ES6 based on how modules are bundled and exported. To begin let's look at the ES6 documentation. The above method is to import exported members. Well what about my map, catch, etc. RxJS methods? They are not exported from the 'add' directory as they are meant to be patched from that location, so you must import the physical module where they reside using the following syntax:

import 'module-name';

The RxJS documentation eludes to this process, and what we are doing is patching the Observable's prototype under the covers. If you want to see this in action, manually navigate to the map.js file located in the 'rxjs/add/operator/map' directory within 'node_modules' (or via GitHub), and take a look at the code.

Observable.prototype.map = map;

However, if you wish you can still use the following ES6 import as well:

import { map } from "rxjs/operator/map";

I like this for consistency, but there is a difference in the (2) different styles of importing. The module import and patching of Observable is actually better for size-sensitive bundling needs. You just need to make sure you import all needed methods before they are used. Importing and calling the methods directly safeguards against calling methods that haven't been patched, but at the cost of additional code resulting in a larger bundle size.

So fear not, you aren't sloppily mixing implementation styles with your RxJS import statements. Just understand the different styles and stick to one for consistency. There are some additional best practices about importing these modules once per application and enforcing it during linting if you go the route of patching. You can find out more about that process using rxjs-tslint-rules


Saturday, May 7, 2016

Chutzpah and non-ES5 JavaScript for Unit Testing is Problematic

I've been working with Chutzpah for VS.NET as a test runner for my Jasmine JavaScript unit tests and ran into some issues that had me essentially stuck and running out of debugging options. I mined Matthew Manela's samples, GitHub repo, articles, log tracing, settings files, simple test harnesses, and many other trial and error event before finally determining the root cause of my headaches.

No matter how simple it seemed of a test harness I used in JavaScript to test using Chutzpah, I kept getting errors like the following: 
Can't find variable: myVariable in file xyz....
Normally this is an indication that the referenced JavaScript file is not properly referenced and the test cannot use it. Therefore the test fails and complains that a variable can't be resolved because ultimately the file is not referenced or not referenced properly. Or so it appears on the surface.

This is the red herring...


This led me on a path of vigorous path tracing, trying different path notation for referencing, using chutzpah.json files, running from the command line, debugging, refactoring, and on and on. No matter what I'd do I couldn't apparently get the file referenced for the unit test to run.

Naturally what makes this all worse was that if I open my JS tests in the browser using the default Jasmine Test Runner, they of course pass. So I know it's only a problem with Chutzpah running my tests.

I do the most basic of tests:

expect(true).toBeTruthy();

This passes. So at least I know VS.NET and Chutzpah can actually work together. 

Here is the crux of it and I'm not sure why it dawned on me but I decided to investigate my JS code. I had begun to sprinkle in some ES6 syntax that by now was compatible in most current browsers. Things like 'class' or 'for...of' loops. The problem is Chutzpah uses the PhantomJS headless browser to run the unit tests. It is based off the WebKit layout engine, so its about like running tests in Safari.

However I was completely wrong in this assumption. From the following (albeit an older package the reference still holds for this topic): 
"Most versions of PhantomJS do not support ES5, let alone ES6. This meant that you got all sorts of errors when you tried to test ES6 features, even if you had used the Babel/6to5 transpiler."
PhantomJS today appears strictly ES5 compliant and even a single line of ES6 syntax in your JS file will cause the referenced file not to be processed and thus serving up the error that it cannot be found. It can't be found because it can't be understood by PhantomJS. Hence the red herring about not being able to understand a variable being referenced in my test because the JS class could not be used.

I had one particular JS class I thought was 100% ES5 and this made the debugging even worse. The way I finally sniffed out some ES6 syntax was to drop it in a TypeScript file and target it to transpile to ES5 JS. When I compared the files side-by-side sure enough I found some ES6 syntax in my JS files. Once I ported the ES5 compliant JS over, Chutzpah and PhantomJS both worked perfectly and my tests passed within VS.NET.

I think the lessons learned here are the following:
  • PhantomJS which Chutzpah uses to run unit tests requires ES5 only JS, so make sure all of your JS is ES5 transpiled (Babel, TypeScript, etc.) and target these source files for the unit tests
  • If able to write and target ES6 features and browsers and not wanting to transpile to ES5 compliant JS, consider using a different JS Test Runner than Chutzpah.

Friday, March 4, 2016

Why is the tsconfig.json file not copying my TypeScript files to wwwroot?

If you've been looking into ASP.NET 5 (eventually .NET Core 1.0) and working with TypeScript you'll notice things are very different than when using older versions of ASP.NET. Specifically the need to configure your TyoeScript virtual project using a tsconfig.json file.

Within the file you'll need to add a line such as the following to indicate where the transpiled .js files will be copied in wwwroot:

"outDir": "../wwwroot/appScripts",

The source directory has a documented convention though (at least at the time of this entry) that could be easily overlooked. I found the information on this GitHub thread. The tsconfig.json file will only check for TypeScript files in the scripts folder. Therefore you must have your tsconfig.json file within the /scripts folder in order for the outdir value and ultimately copying of files to work.


Tuesday, July 28, 2015

Git Ignore to Untrack TypeScript Auto Generated Files

When using TypeScript you really don't want the transpiled output files created from the source .ts file to be committed to the repository. This is because the output could be looked at analogous to the /bin generated files which we all know are not to be committed. The TypeScript auto-generated files (.js and .js.map) will be built independently for each user's source, and only the single .ts file should be committed. 

The only exception I see to this process is if there is a restriction on TypeScript compiling on the server (i.e. CI build server) in which case the actual .js file might have to be committed. As long as the TypeScript compiler is present for compilation, only the .ts file should be committed.

To ignore the auto-generated .js and .js.map files for a new project the process is quite simple. Just add some rules to the .gitignore file at the root of your project like below and these files will not be tracked.

# Typescript Auto-generated files
# Note: all files must be TS files in this directory or ordinary JS files could be removed
# Modify as needed to preserve files and be more explicit
BowlingSPAWeb/BowlingSPA/app/*.js
BowlingSPAWeb/BowlingSPA/app/*.js.map
BowlingSPAWeb/BowlingSPA/app/controllers/*.js
BowlingSPAWeb/BowlingSPA/app/controllers/*.js.map
BowlingSPAWeb/BowlingSPA/app/services/*.js
BowlingSPAWeb/BowlingSPA/app/services/*.js.map

The above still needs to be done for existing projects, but if you see tracked changes already showing up for your repository, you are going to have to manually remove them from being tracked since they are already a part of the repository. From the Git docs:
If you already have a file checked in, and you want to ignore it, Git will not ignore the file if you add a rule later. In those cases, you must untrack the file first.
The easiest way to do this is to run the following command against the applicable files using Git Bash commands. I find opening the Git Bash command prompt directly from the directories makes this process easiest.

git rm --cached myfile.js
git rm --cached *.js
git rm --cached *.js.map

You may prefer instead of using wildcards (like above) to manually address each file individually applying the command. It's a 1 time deal to remove the tracking, so it might be best to be explicit as I did it below:


Note, once successfully removed, you can't run the command again or you will get an error message similar to the following:
fatal: pathpec 'myfile.js' did not match any files
This is because the file has already been removed from the repositories tracking so there isn't any command to preform against it.

If using VS.NET, you should see after refreshing that these files are now shown as being deleted from the repository. 


I do recommend that you commit from the Git Bash command line when removing these files. I had mixed results when jumping over to VS.NET to commit, as the deleted files were not shown as changes to the master to be synced to the server. Only once I committed from Git Bash did it actually apply and commit successfully:


After committing and on subsequent updates, the changes to the TypeScript auto-generated files should no longer be tracked and shown as 'Included Changes'

Tuesday, July 14, 2015

Which Version of TypeScript is Installed and Which Version is Visual Studio Using?

My rating of TypeScript on a scale of 1-10... a solid 10

My rating of finding out which version of TypeScript is installed and being used currently... a 2. 

Sometimes the simplest of things are missed and I think this is one of the cases. There is a lot of playing detective and resulting confusion that will come about trying to figure out which versions of TypeScript are actually installed and subsequently, which is targeted for VS.NET to compile against. I'm here to clear up this confusion and shed some light on this for TypeScript users.

The TypeScript compiler (tsc.exe) is installed through the installation of VS.NET 2013 Update 2 (or later versions), VS.NET 2015, or via the TypeScript tools extensions available through the VisualStudio Gallery. VS.NET users of one of the aforementioned versions are in a good place because TypeScript having been created by Microsoft integrates well into VS.NET. Regardless of installation method, the tooling and compilers are available at the following location:

C:\Program Files (x86)\Microsoft SDKs\TypeScript

As can be seen from the screenshot below, I have folders for versions 1.0 and 1.5:


Now before moving further, the way you've probably found to find out which version of TypeScript is installed is to send the -v option to the compiler which will "Print the compiler's version." You can do this from any location using the command prompt. Doing so on a default installation of say VS.NET 2013 with the 1.0 SDK folder present will yield the following:


Notice we have a SDK folder for version 1.0 however the compiler version is 1.0.3.0. This is because what really matters is not the folder, but rather the actual version of the compiler within the folder. In this case the 1.0 folder contains version 1.3 of the TypeScript compiler.

As mentioned, you can run the -v option against the compiler from anywhere. If you run this command against the directory that physically contains the TypeScript compiler (tsc.exe), then the resulting version output will be that of the compiler in the SDK directory targeted.

Running the version command against the 1.0 directory:


Running the version command against the 1.5 directory:


OK great, we can run version commands in different spots and find out about versions of the compiler. However which one are VS.NET and my project using, and where is that compiler version coming from when I run the -v option in a non-TypeScript SDK directory?

Let's address the global version question 1st. You can run the where tsc command from any command line which will tell you the TypeScript compiler location the version is returned from using the version option:


OK so I have SDK tools version 1.0 (compiler version 1.3 as we know) and 1.5 installed. Why is it returning only the tsc.exe information from the 1.0 SDK folder? It turns out that this information is actually a part of the PATH environmental variable in Windows. There is no magic or real installation assessment going on here. It simply reads the directory value embedded within the path variable for TypeScript and finds the tsc.exe version within that specified directory. Here is what was within my Windows PATH variable for TypeScript:

C:\Program Files (x86)\Microsoft SDKs\TypeScript\1.0\


Before we get much further it turns out all these versioning commands, PATH variable values, and the like, they have absolutely no bearing at all on which version of TypeScript VS.NET is using and compiling against. I'll get to that in a minute. 

However every Google search for, "which TypeScript version do I have installed" yields a bunch of results saying, "run tsc -v" which ultimately reads that value in the PATH variable and confuses the heck out of people. They get concerned that VS.NET is not targeting their newer version of TypeScript installed. 

The matter of fact is that TypeScript can have multiple side-by-side installations and it's all about the project's targeted value and none of what's in the PATH variable is important. You would think if the TypeScript team wanted to use the PATH variable they would update it to the newest version upon installing a newer TypeScript version. Not so. It remains stagnant at the old version which then shows the older TypeScript compiler version thus leaving everyone confused.  I found this comment on the following GitHub thread which confirms, folks will have to update the PATH variable manually for the time being:


Before manually changing the PATH variable to point to the newer TypeScript SDK version, lets look at what VS.NET reads to know which compiler to target. Unfortunately it is not available as a nice dropdown in the TypeScript properties for the project (hence adding to my rating of '2' for the version fun with TypeScript). Instead it is in the project's properties configuration within the .csproj or .vbproj file. I particularly like the EditProj Visual Studio Extension which adds a nice 'Edit Project File' to the context menu when right-clicking a project within VS.NET. Doing this will bring up the project's configuration, and I can see the TypeScript version targeted and used by the project inside the tag:


Now VS.NET will append this value to the C:\Program Files (x86)\Microsoft SDKs\TypeScript\ path to get the compiler used for the project. In this case we know from above the 1.3 version of the TypeScript compiler is in that directory. 

Let's do a test and write some TypeScript using the spread operator that's not fully supported until ES6 or version 1.5 of TypeScript which can compile to ES5 JavaScript. Technically version 1.3 of TypeScript can still compile the following to JS but it will complain in the IDE which is what we'd expect:


Notice how we get the red squiggly under the spread operator usage (three dots ...) and a notice that this is a TypeScript 1.5 feature.

Now we can prove the tsc -v output and resulting PATH variable value are not what's being used by VS.NET (it's the Tools Version I showed above). If we change the PATH variable TypeScript directory value from:

C:\Program Files (x86)\Microsoft SDKs\TypeScript\1.0\

to:

C:\Program Files (x86)\Microsoft SDKs\TypeScript\1.5\

...in the System variables (the TypeScript directory is embedded within the Path variable, so copy out to Notepad to locate and modify):


...and open a new command window we can see now the tsc -v command reads the updated PATH variable and outputs the resulting 1.5.0 version. 


So cool right? VS.NET should now reflect version 1.5 of TypeScript being used and our warning should go away. Nope. Save your TypeScript file, rebuild, reopen VS.NET, do whatever you feel, and you will still see the warning above. That's because what matters to VS.NET is what version is in it's own project configuration and not what the PATH variable returns via the version command.


What we need to do is manually update the project's configuration to point to the 1.5 SDK tools version (remember this should be the value of the folder that VS.NET appends to the SDK directory and not the actual compiler version). Using the 'Edit Project' tool I mentioned previously, I can change the 1.0 tools version to 1.5:


If I go back to my TypeScript file, immediately I notice the spread command is understood and accepted as we are pointing to version 1.5 of the TypeScript compiler:


So that's TypeScript versioning as of today. If you want to target a newer (or older) version of TypeScript, or just want to see which version your project is currently using, you'll need to take a look in the project's configuration for the  value.

As an aside, VS.NET will warn you if you have a newer version of the TypeScript tools installed, but your project is targeting an older version. It will ask if you would like to upgrade your project:


I can say I've had mixed results saying  'Yes' to this dialog including while writing this post. It did not update the version to 1.5 in my project's properties. I still had to manually modify the version.

To this end, I've made a recommendation on Microsoft Connect that the TypeScript tools version (and corresponding compiler version), be selectable from within the IDE on the 'TypeScript Build' tab within the project's properties. You can read and vote for this if you would like here: Allow switching TypeScript configured version from Project Properties IDE