Monday, March 1, 2010

Dealing With The 'Unrecognized Element 'extendedProtectionPolicy'' Exception

Recently I began using Windows 7 Ultimate in addition to VS.NET 2008. I had to refresh a reference to an existing WCF service which did just fine. However, upon deploying the application back out to the production Windows Server 2003 server, I began to see the following exception being thrown:

"Unrecognized element 'extendedProtectionPolicy' "

I actually could have seen this listed as a 'Warning' prior to compile with the following message as well:

"The element 'transport' cannot contain child element 'extendedProtectionPolicy' because the parent element's content model is empty."

This is all in reference to the following configuration element that appeared in my client's .config file in regards to the WCF service being consumed:


Regardless of where the issue is noticed, it appears this is caused by the usage of multiple platforms. It appears that the configuration is only created when consuming the service on my Windows 7 development box, but then not recognized by other platforms such as Windows Server 2003. The 'ExtendedProtection' configuration as I understand is to help prevent attacks during the credential challange process. However due to its staged rolluot, it is not fully supported and hence the above errors are generated.

The fix? Simple for the time being. Just remove the tag and redeploy the configuration. Depending on the configuration, it may be embedded between a set of "Transport" tags. If this is the case remove the inner "extendedProtectionPolicy" tag, and shorthand the end of the transport tag "/>"

Tuesday, February 2, 2010

Dealing With the Removal of the ASP.NET Silverlight Server Controls in Silverlight 3

Silverlight 3 has been out for some time now, and most Microsoft sites you may visit often (including Microsoft Update) will prompt you to do the install. If you did the install and removed all of Silverlight 2 including the SDK as required to run the full Silverlight 3 SDK, then you may have notices a few things break in your existing Silverlight 2 applications or controls.

This is because with the advent of Silverlight 3, the convienient ASP.NET Silverlight server controls were removed. The solution is to use the more generic <object> tag to reference controls and pass parameters. While I understand the premise behind this and have seen quite a lot of documentation, I have not see a lot of thorough examples on a 1:1 conversion. In fact in some instances I read where the <asp:mediaplayer> tag was used, that the .js encapsulated behind that would now have to be incorporated into your control. The suggestion was to use Blend with Encoder to make this easier by using one of their templates, and then exporting a .xap file.

I think the easier conversion will be for those that used just the <asp:silverlight> tag to reference a .xap control. In this case you could probably easily convert the code to using the <object> tag and pass in any needed parameters. However, I think converting the <asp:mediaplayer> references are going to involve more work.

If you are looking for the fastest solution to fix your current application so that it will work, to buy time to make the full conversions to SL3 (or maybe wait until SL4 is RTM, because my experience is each SL release has had major changes that don't upgrade so well; that's ok though - the growing pains come with the territory of new technology) then here it is. You need to go to the /bin of a currently deployed solution and try to find the following .dll: System.Web.Silverlight This .dll has the asp.net Silverlight Server controls. If you copy that .dll into a 'Components' directory of sorts (or into the /bin, however your process dictates) and add a reference to that .dll, your errors should go away. If you do not have a copy of the .dll anymore, you can download the Silverlight 2 SDK and get the .dll from there as well.

For a more detailed reference on ensuring your Silverlight 2 application work with Silverlight 3, check out the following link:
Ensuring That Your Silverlight 2 Applications Work with Silverlight 3

For a more detailed reference on persisting the Silverlight 2 ASP.NET server controls, take a look to the following whitepaper:
ASP.NET Server Controls for Silverlight in the Silverlight 3 SDK

One of the better references I have seen for parameters that can be passed to an <objectgt; tag:
Silverlight 3 object tag param list

Saturday, January 30, 2010

How To: Set Up BitLocker Full Disk Encryption + Pre-Boot Pin in Windows 7 Ultimate

Ok, this goes in the "and Beyond..." category because this post is not specific to .NET, but about setting up full disk encryption using a product by Microsoft named BitLocker. BitLocker is included is some of the premium Windows Vista and Windows 7 editions; specifically this post speaks of how to set up full disk encryption on Windows 7 Ultimate Edition.

There are several reasons for using full disk encryption; sometimes it is a requirement of the company you work for, or maybe you have sensitive information that needs to be secured in the event of your computer being lost or stolen. While traditionally you may think of using BitLocker just for laptops because of their portability which brings an increased risk of loss or theft, this could be done on a desktop with the appropriate hardware required as well.

I will preface these directions with some cautions and warnings. The process although not rocket science, is a series of steps that must be followed quite closely with no variations. I myself have had some unsuccessful attempts at setting up the encryption, which caused an OS failure, and the need to reformat and reinstall the OS again. That being said... "BACK UP EVERYTHING IMPORTANT BEFORE SETTING UP ENCRYPTION!" Ideally, you would do this initially upon getting a new laptop with Windows 7, or after doing a fresh install. That way if you run into any major issues, you can re-image the machine to its default configuration and start over again. I do believe that encryption overall makes the hard drive a tad bit more volatile, so regardless of the success of encrypting your disk, I recommend backing up important files from time to time after encryption is complete.

There are a few prerequisites to using BitLocker and full disk encryption. 1st, you need to have Administrative rights on the machine. The 2nd I already spoke of and that is needing Windows 7 Ultimate. The 3rd is a device that is imbedded in the laptop or machine called a TPM or "Trusted Platform Module". The TPM is responsible for generating and storing a keyset used for the drive encryption and for integrity checks of the system boot files. This results in securing the system volume with encryption and integrity checking the system boot files to ensure that nothing has been tampered with and the system drive is located in the original computer. Only then is decryption preformed. While there are software only solution for full drive encryption, they are more susceptible to hackers than BitLocker used with a TPM. Microsoft has published a wealth of detail on the underlying workings of BitLocker and the TPM, so I will not repeat it here. If you are interested, check out either of the following sites:

BitLocker Drive Encryption Team Blog

TechNet: BitLocker Drive Encryption


Alright now to the meat and potatoes of this project. Remember, try to follow each step as closely as possible without deviation for the nest results.

Step # 1: Backup all important files. Let me say again... Back up all important files. Just in case you have any issue with setting up BitLocker, you will not have lost all of your important data.

Step # 2: Update the BIOS for your machine to the most up to date version. Each motherboard or machine is going to have their own website for instructions and downloading and updating the BIOS. For example Dell has a site for its updates, ASUS has a site for their motherboard updates, etc. Oh, and if you are reading this and not sure what the BIOS is... I recommend to halt this procedure and not continue. Just my advice.

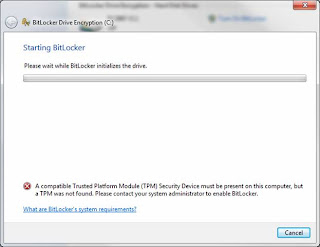
Step # 3: Log into Windows after the BIOS is updated and go to the following: Start -> Control Panel -> BitLocker Encryption. Find your Hard Drive and select "Turn BitLocker On". It should probably not work giving you the message below stating a TPM could not be found. If for some reason the BitLocker process begins because your TPM was already configured, should cancel the process and do the 2nd part of Step # 4: Configuring the boot sequence from the BIOS.


Step # 4: Enter the BIOS on boot and Enable the TPM and configure the boot sequence. 1st, enter the BIOS and find the TPM settings. They are probably under a 'Security' heading or something similar. All BIOS menus are different, so I don’t have the specific directions for each one, but navigate around until you find it. Once you do, select the option to enable it. 2nd, reconfigure the boot sequence. Make sure that any option for USB or Flash drives boot AFTER the Hard Drive. This sort of undocumented step caused me a lot of failed encryptions in later steps. The reason is that upon doing the BitLocker System Check, the system reboots and checks to make sure the generated keys placed on your USB Flash Drive actually work properly, prior to actually doing the encryption. Well if the USB is ordered to boot prior to the hard drive, the machine thinks you are using the USB as a boot device and forfeits the BitLocker check. You need to have the hard drive boot prior to the USB drive. No worries, though, if you ever need to boot from a DVD or flash, just go back in and switch the order to do whatever processing you need and then switch it back. Save your changes and exit the BIOS.

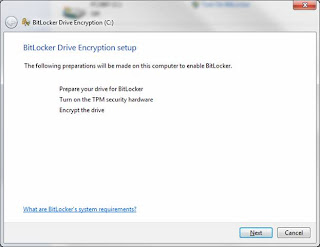
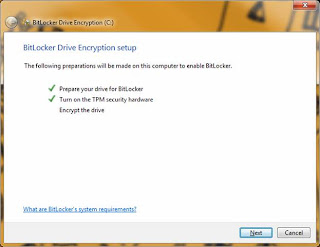
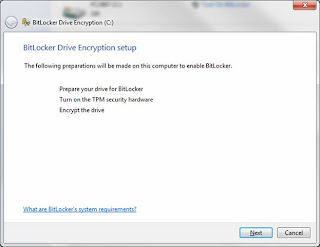
Step # 5: Set up BitLocker and the TPM. Log all the way back into Windows (do not shut down in-between) and go back to the BitLocker Encryption option in the Control Panel. Press "Turn On BitLocker" again. This time the BitLocker process will recognize a TPM enabled and being the process. You should see screens such as the following below:


Press 'Next' to begin BitLocker preparations:


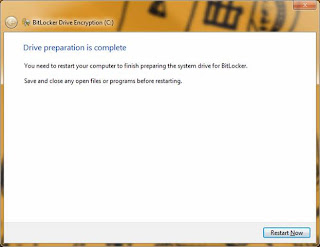
Press 'Next' to begin the allocation of space for BitLocker:


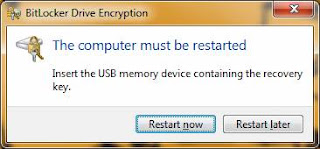
Press 'Restart Now' and allow the machine to reboot as displayed below:


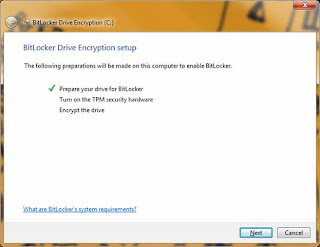
Upon logging back into Windows, BitLocker will continue the process automatically, so do not attempt to open anything else. You will see the screen below, and to continue the process press 'Next':


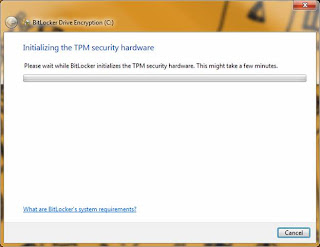
Upon completing the steps above, you will be prompted to reboot the computer so that the TPM can be configures. Press 'Restart' as directed. Upon rebooting, you will see a basic MS-DOS old school looking screen informing you that the TPM has been modified and do you want to allow the modification. Allow the modification and follow the directions to press the appropriate button. In my case I selected the 'Modify' (not the 'Ignore') so that the TPM configuration could be modified. Upon completion, the machine will reboot. Log all the way back into Windows. The BitLocker process will proceed automatically again. You should see a screen like below:


One the TPM hardware has been configured you will see a screen like below; press 'Next' to continue the process:


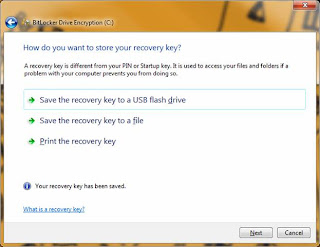
At this point you will be prompted to save off the recovery keys. These are the keys that are stored in the TPM, and are only needed in the event of system tampering or breech. I recommend doing all (3) options, and storing the keys to a USB drive, printing them off, and saving them off to a location OTHER THAN the system drive (secure network share, etc.). Obviously I should not need to explains too much here that the keys regardless of type (paper, USB, file) need to be locked away. Don’t leave the USB on the desk next to the laptop, or the paper with the keys folded under the machine. That is like leaving the keys to the car in the door lock. Continuing on...press each option in the screen below to save off the keys:


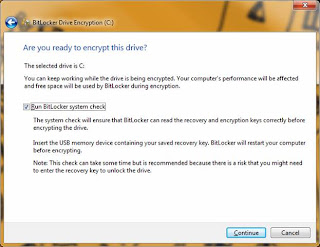
Step # 6: Run the BitLocker Check (USB with keys saved from Step # 5 required for this step). After saving the keys from above, press 'Next. You will see the screen below asking if you want to run the BitLocker check. While not required, I recommend doing it. You don't want to encrypt the drive until you have tested that the generated keys actually work. Check the box to run the BitLocker check and make sure that the USB drive IS INSERTED in the machine. Press 'Next' and the following reminder and reboot screens will be displayed:


Step # 7: Full drive encryption. Upon a successful reboot and USB keys check, the BitLocker process will automatically being the encryption process of the system volume. This will take several hours depending on the size of the drive, but you can continue to work in the background if needed. However, do not reboot or shut down during the encryption process. You can lock your machine if needed. The encryption dialog (shown below) will display the progress.


Step # 8: Configure the machine policy to require a pre boot PIN + TPM (Optional). Once the encryption is complete, you are technically done. The drive is encrypted and secure. You will notice upon reboot you are never prompted for the keys or a password. That's normal. The TPM has the keys, and if there was any breech or integrity failure, you would be prompted for the keys. Otherwise the authentication occurs in the background and is seamless.

However, to strengthen your security you may want to configure a pre boot PIN that works separately but in conjunction with the TPM. To accomplish this, follow Step # 8 and Step # 9 and Step # 10.

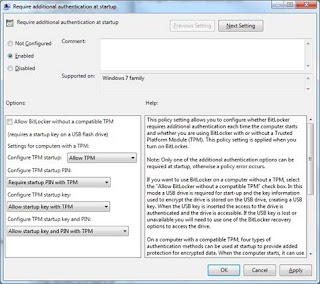
We need to open the Group Policy editor for the machine. Goto Start -> and type in gpedit.msc and press 'Enter'. Then Goto: Local Computer Policy > Computer Configuration > Administrative Templates > Windows Components > BitLocker Drive Encryption > Operating System Drives and right click the option "Require additional authentication at startup" and select "Edit". The screen is displayed below:


Select "Enabled" and then select "Require startup PIN with TPM" under the "Configure TPM startup PIN:" dropdown. Click "Apply, "OK" then close the dialog and Group Policy editor. This now allows us to configure the pre boot PIN from the command prompt.

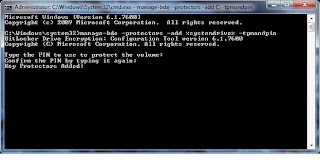
Step # 9: Goto Start and type in cmd but do NOT press enter. Once the cmd application displays in the start menu, right click it and state "Run as Administrator". Click "Yes" on any security dialogs that may appear. To configure the pin we need to use the manage-bde.exe tool. To configure the PIN, enter the following and then press 'Enter':

manage-bde -protectors -add %systemdrive% -tpmandpin

You will be prompted to enter a PIN. (Note: I did notice if you still have the USB with the keys inserted into the machine, this process does not work - the command prompt never asks you to enter the PIN; make sure to remove it before doing this process). The PIN by default can only be numeric. There is an option in the group policy editor from Step # 7, to allow complex PINs for this process, but wars not all systems support it. Since you may not find that out until reboot, and not be able to log back in, I suggest just using a numeric PIN. You will be prompted to enter it twice, and upon success, see a screen like the one below:


Step # 10: Reboot and test the PIN. Upon rebooting, after the quick flash of your system manufacture screen, you should receive an old MS-DOS style screen prompting you for your PIN. It tells you the function keys can be used to represent numbers, but I always just use the keypad and it works fine. If needed, the option is there. Upon entering the correct PIN the machine will continue booting into Windows. One note on the pre-boot PIN: I have found that if you have your USB containing the keys inserted upon boot, it assumes you are validated and skips the prompting of the PIN. Since your USB drive should be locked away, you will be prompted for the PIN, but again, another nice option if needed.

And that is it! Hopefully your encryption process went well and you are complete at this point. I have done this process on 7 different machines with success, so I know it works when followed as directed. Your drive will now be secure with BitLocker.

Tuesday, January 26, 2010

Add Missing Build Configuration DropDown to VS.NET

If you are like me, then you probably enjoy the convenience of the Build Configuration menu inside of Visual Studio.NET. This is the menu that contains the "Debug" and "Release" modes for project deployment configuration. Well when I build a new machine or re-install VS.NET, I notice that the build dropdown is not always displayed by default. So here are a few simple steps to get the menu back being displayed.

1. Goto the View -> Toolbars-> Customize menu in VS.NET. Select the 'Build' category on the left side, and scroll down to "Solution Configuration". Click and drag it to the location on your VS.NET menu where you would like it to be located. At this point you probably notice the dropdown is added, but is greyed out, and might not even have any option shown similar to the picture below (Step # 2 fixes this):


2. To now enable the menu goto the Tools -> Options menu. On the left side expand the "Projects and Solutions" section and select "General". Then on the right hand side, check the box that states "Show advanced build configurations".


That's it! You should now have an enabled build configuration menu in VS.NET.

Sunday, January 10, 2010

How To: Create an ASP.NET style Windows Authentication Policy for WCF Services

For those of you that program on a Windows Domain probably in a corporate environment, you were probably well familiar with using Windows Authentication in .asmx web services to restrict or permit users access. Do you remember how easy it was in a .asmx web service to allow only a specific user or group? Take a look below from the only setting needed in the web.config file associated with the web service:


That was it! Now let's not start off on the wrong foot here or give the wrong impression. I am a huge advocate of WCF over .asmx services and definently think it is the way to go. With WCF having such a broad use capability and granular level of control and functionality, came the loss of some of the bundled up functionality that was specific to IIS hosted .asmx web services. This is not a bad thing at all.

However, those of us that work with WCF came to quickly realize that with just a small configuration you could easily configure WCF to only allow Windows Authenticated users to access the service, but that was it. There was no clean direct way to restrict the Windows Users or Groups in a 'blanket' fashion as was the case with .asmx web services and the configuration shown above. Not even setting the WCF service to ASPCompatibilityMode could directly accomplish the configuration above.

So there are (2) main ways to get around this issue. The 1st method to get around this would be to define PrincipalPermission attributes on every method to define its security requirements. This means hardcoding the security requirements, and is not as flexible as info that comes from a .config file. In some cases this method by method style of security may be desired, but often our services are an all or nothing style of access.

The 2nd solution, and the focus of this article, is to intercept the authorization calls to your WCF service and examine the identity of the user making the call to determine if they are authorized. We as developers are provided the ability to extend the 'ServiceAuthorizationManager' class and override the 'CheckAccessCore()' method to define our own custom authorization policy for the service. It is within this method that you can scrutinize the individual roles, groups, or users authorized by extracting the WindowsIdentity of the context, and then either permitting or rejecting access based on your requirements. Within here you could pull the authorized roles, users, or groups from the WCF .config file.

To get right to the code, below I have provided the implementation of the overriden 'CheckAccessCore()' method. The robust comments within should detail well what each step is doing:


Imports System.Configuration
Imports System.Security.Principal
Imports System.IdentityModel.Tokens

'''
''' The Identity Model infrastructure in Windows Communication Foundation (WCF) supports an extensible claims-based authorization
''' model. Claims are extracted from tokens and optionally processed by custom authorization policies and then placed into an
''' AuthorizationContext. An authorization manager examines the claims in the AuthorizationContext to make authorization decisions.
''' By default, authorization decisions are made by the ServiceAuthorizationManager class; however these decisions can be
''' overridden by creating a custom authorization manager. To create a custom authorization manager, create a class that derives
''' from ServiceAuthorizationManager (this class) and implement CheckAccessCore method (done in this class). Authorization
''' decisions are made in the CheckAccessCore method, which returns 'true' when access is granted and 'false' when access is denied.
''' In our case, we are examining the Windows Identity of the current user's context and checking it against some predefined
''' permitted users and roles from the AppSettings section of the associated services' .config file.
'''

''' Because of performance issues, if possible you should design your application
''' so that the authorization decision does NOT require access to the message body.
''' Registration of the custom authorization manager for a service can be done in code or configuration.
'''

Public Class CustomAuthorizationManager
Inherits ServiceAuthorizationManager

Protected Overloads Overrides Function CheckAccessCore(ByVal operationContext As OperationContext) As Boolean

'For mex support (starting WCF service, etc.)
'NOTE: Other than for service startup this will NOT be true because the WCF
'configuration dictates that WindowsCredentials must be sent and Anonymous users
'are NOT allowed.
If operationContext.ServiceSecurityContext.IsAnonymous Then
Return True
End If

'If Windows Authentication has been defined in the binding and either of the (2)
'predefined AppSettings are populated, proceed to authorize current user/group against allowed users or groups.
If (ConfigurationManager.AppSettings("AuthorizedGroups") IsNot Nothing) OrElse _
(ConfigurationManager.AppSettings("AuthorizedUsers") IsNot Nothing) Then

Dim IdentityIsAuthorized As Boolean = False

'Extract the identity token of the current context user making the call to this service
Dim Identity As WindowsIdentity = operationContext.ServiceSecurityContext.WindowsIdentity
'Create a WindowsPrincipal object from the identity to view the user's name and group information
Dim Principal As New WindowsPrincipal(Identity)

'Prior to proceeding, throw an exception if the user has not been authenticated at all
'if the 'AppSettings' section are populated indicating the Windows Authentication should be checked.
If Identity.IsAuthenticated = False Then
Throw New SecurityTokenValidationException("Windows authenticated user is required to call this service.")
End If

'Define (2) string arrays that will hold the values of users and groups with permitted access from the .config file:
Dim AuthorizedGroups As String() = Nothing
Dim AuthorizedUsers As String() = Nothing

'Procced to check the AuthorizedGroups if defined, against the current user's Groups
If ConfigurationManager.AppSettings("AuthorizedGroups") IsNot Nothing Then
'The values in the .config are separated by a comma, so split them out to iterate through below:
AuthorizedGroups = ConfigurationManager.AppSettings("AuthorizedGroups").ToString().Split(",")

'Iterate through all of the permitted groups from the .config file:
For Each Group As String In AuthorizedGroups
'If the user exists in one of the permitted Groups from the AppSettings "AuthorizedGroups" values,
'then set value indicating that the user Is Authorized.
If Principal.IsInRole(Group) Then IdentityIsAuthorized = True
Next

End If

'Procced to check the AuthorizedUsers if defined, against the current user's name
If ConfigurationManager.AppSettings("AuthorizedUsers") IsNot Nothing Then
'The values in the .config are separated by a comma, so split them out to iterate through below:
AuthorizedUsers = ConfigurationManager.AppSettings("AuthorizedUsers").ToString().Split(",")

'Iterate through all of the permitted users from the .config file:
For Each User As String In AuthorizedUsers
'If the user exists as one of the permitted users from the AppSettings "AuthorizedUsers" values,
'then set value indicating that the user Is Authorized.
If Identity.Name.ToLower() = User.ToLower() Then IdentityIsAuthorized = True
Next

End If

'Return the boolena indicating if the user is authorized to proceed:
Return IdentityIsAuthorized
Else

'Call the base class implementation of the CheckAccessCore method to make authorization decisions
'since no defined users or groups were defined in this service's .config file.
Return MyBase.CheckAccessCore(operationContext)

End If

End Function

End Class

Notice from the code above, that we have defined (2) key values which of at least (1) must exist for the code above to work. The appSettings sections are named: AuthorizedGroups and AuthorizedUsers. Below is a sample configuration using both of these values:


In addition to the overridden method and appSettings values, we must configure the WCF behavior for our service to indicate the Service Authorization Manager name as displayed below:


You also need to specify within the binding that the clientCrendentals are of type 'Windows'. To show the node fully, I have included the full 'Security' node in which I was using Transport security, but this can be configured for your needs and is not specific to this procedure:


That will be everything you need to 'intercept' the authorization calls to your WCF service and scrutinize the users permitted. Want to see it work? The easiest way to test this is to build a WCF Service and add the code from this article into or above the Service1 default class that is generated from VS.NET. Once your WCF will compile, start the service locally (no need to install) and place a breakpoint on the 1st line in the 'CheckAccessCore()' method. You will be able to tell if the WCF service starts because service client dialog window will display with the methods in your test service. If you leave the default generated code in the service, it exposes (2) methods: GetData() and GetDateUsingDataContract().

To test this all out I created a test ASP.NET web application and consumed the WCF service. Make sure the service is running when attempting to consume it. You can find the link to consume your service in the WCF Service dialog window. For my test project, mine happend to be net.tcp://localhost:8731/Design_Time_Addresses/WcfServiceWindowsSecurityTest/Service1/mex

Once consumed, I added a little bit of code to test as shown below:


Dim wcfSecurityTest As New WindowsSecurityService.Service1Client
'Obviously NEVER hardcode credentials like the example ONLY below
wcfSecurityTest.ClientCredentials.Windows.ClientCredential = New System.Net.NetworkCredential("jsmith", "testpassword", "MyCompany")
'Upon making the call below, the WCF will call the overriden CheckAccessCore() method to allow or reject authorization:
wcfSecurityTest.GetData(2)

When calling the 'GetData()' method above and having a break point in the running WCF service, you will notice the WCF service hit the breakpoint in our 'CheckAccessCore()' method (pretty cool). From here you can debug the method and see how it works.

Hopefully this gets you back to enabling whole application Windows Authentication on your WCF services!
Sunday, December 13, 2009

Running a Periodic Process in .NET using a Windows Service

The need does arise from time to time (literally) to process some repeated task in .NET. This question comes up a lot and about the best way of solving this problem. Should I poll repeatedly? Do I use a timer? What kind of timer should I use? etc...

Usually this question comes up when the need arises to do any of the following examples: checking for new information, reporting, sending emails, updating content on a screen, maintenance, and the examples go on and on.

I prefer to relegate this type of task to a Windows Service. The service can be created using Visual Studio .NET and then installed on your machine or server. The service is always running (once started) and provides a good mechanism for preforming repeated background tasks like periodic execution.

After doing research on this topic myself, I have found the best way to have a process run on a set time interval is to use a 'ThreadPool.RegisterWaitForSingleObject' from the System.Threading namespace. As from the
MSDN on this method: "Registers a delegate to wait for a WaitHandle, specifying an integer for the time-out in milliseconds."

The 'RegisterWaitForSingleObject' method registers a delegate to wait for a WaitHandle, specifying a timeout. It allows this service to tell the thread pool, "Hey, could you call me when this object is signalled or the timeout has elapsed? Thanks." The method queues the specified delegate to the thread pool (The thread pool uses background threads). A worker thread will execute the delegate when one of the following occurs:


-The specified object is in the signaled state.
-The time-out interval elapses.

This method will repeatedly call the delegate each time the timespan value has elapsed, or until the 'Unregister' method has been called. The callback method registered can do anything you need. The actual method will probably be local to the service, but from there you could make a call to a .dll, WCF or .asmx service, etc. to reuse existing functionality that may already exist. You just need the Windows Service to the the work of waking up every so often to do some work.

You can implement 1:many of these delegates to run as few or as many repeated tasks from within a Windows Service. I must give credit to the following Blog entry which really helped get me started with using this method: Periodic Execution in .NET <<--Code

The blog link above has a terrific easy to follow code example with explanations of implementing the RegisterWaitForSingleObject within a Windows Service, so I will not duplicate it here. I will just say that I myself have implemented the code and expanded on it, and can say that this is a great way to handle repeated processing of a task on a set time interval.

And lastly, you might be saying "I don't know how to create and use a Windows Service in .NET!". Well to get you going on that (there are quite easy by the way to get up and running), check out the following site:

Walkthrough: Creating a Windows Service Application in the Component Designer

Saturday, December 12, 2009

How To: Bind an Enum to an ASP.NET DropDownList

Enumerations are a great way to categorize and structure a set of data within your application, and is usually a 'next step' or improvement at times from hardcoding miscellaneous values throughout an application. Some examples of using an enumeration might be for month names, credit card types accepted, colors, season names, file formats, and the examples are endless.

You may find that you need or want to bind that enumeration directly to a control such as an ASP.NET DropDownList. The DropDownList is obviously an easy fit for an enumeration as it uses a key-value pair style of data for its 'Text' and 'Value' attributes which align to an enumeration's member name and initializer attributes.

For all of the following examples, we will work with the following simple enumeration using 'Months of the Year' (yes, it may be possible to get this same info by looping through a DateTime object and adding 1 month to each iteration, but this is just to show a basic example of a simple enumeration type):

Public Enum Months
January = 1
February = 2
March = 3
April = 4
May = 5
June = 6
July = 7
August = 8
September = 9
October = 10
November = 11
December = 12
End Enum

Accomplishing this task can be done in so many ways. One way is to directly bind just the enum member values to a DropDownList without its associated name. This may acceptable in the situation of months in the year where only the actual integer value is needed. This code to bind just the values is displayed below:

'Populate the months dropdown (from Enumeration)
Dim tEnumMonths As Type = GetType(Months)
Me.ddlMonths.DataSource = System.Enum.GetValues(tEnumMonths)
Me.ddlMonths.DataBind()
'Insert blank '0' value at beginning of DropDown
Me.ddlMonths.Items.Insert(0, New ListItem(" "))

However, most of the time you will probably find that you want to bind both the member name and its associated value. This way you can display to the user a description and extract its value server side for storing in a database, processing business rules, etc. In this case we need to transform or port the enumeration data from the enum type into a bindable object type to the ASP.NET DropDownList. There are so many bindable types; a few examples are: DataSet, DataTable, DataView, Array, ArrayList, HashTable, Object Collection (Generics), and many more.

In the following I will focus on (3) additional methods. All will involve calling a Shared function in a 'Utilities' call that is accessible by all of the UI. This type functionality is not specific to any specific object and holds no concise responsibility other than being a 'Helper' function. Therefore these methods are Shared and do not require class instantiation to access.

The 1st method will take the DropDownList in question and the Enum type as parameters and perform all of the work necessary to bind the data. This method is a full on binding method specific to an ASP.NET DropDownList, so in that sense it is quite powerful, but offers not much reuse beyond binding to this control type.

Public Shared Sub BindDDLToEnum(ByVal EnumType As Type, ByVal DropDown As UI.WebControls.DropDownList, ByVal InsertBlankZeroValue As Boolean)

'Get the Name (String) values from the Enum
Dim EnumNames As String() = System.Enum.GetNames(EnumType)

'Get the Values (Integer) from the Enum
Dim EnumValues As Array = System.Enum.GetValues(EnumType)

'If the caller requested a blank entry with a value of 0 entered, do that now.
If InsertBlankZeroValue Then
'Add a space and a '0' value at the beginning
DropDown.Items.Add(New Web.UI.WebControls.ListItem(" ", 0))
End If

'Loop through the Enum values and add the name,value pair to a 'ListItem' object to be directly inserted into the DropDownList
For i As Integer = 0 To EnumNames.Length - 1
DropDown.Items.Add(New Web.UI.WebControls.ListItem(EnumNames(i), Integer.Parse(EnumValues.GetValue(i))))
Next

'If a blank '0' value was entered, make sure it is the default selected item. This is important
'for RangeValidator controls and the like to pick up on and validate against.
If InsertBlankZeroValue Then
DropDown.ClearSelection()
DropDown.Items.FindByValue(0).Selected = True
End If

End Sub

As you can also see above, I chose to add an additional boolean parameter named 'InsertBlankZeroValue'. This value dictates if a blank string with a '0' value is inserted as the 1st element in the DropDownList. This functionality could easily be modified, removed, or even expanded (i.e. take additional parameters specifying default name and value rather than '0' and blank) to suit your individual needs.

Now you may want to make some more abstract methods that transform the Enum into a bindable type, but don't want to bind it immediately to a control. In this case I have made (2) more sample methods that simply take the Enum type and return a key-value pair object. The 1st method returns a HashTable as shown below:

Public Shared Function GetHashTableFromEnum(ByVal EnumType As Type) As Hashtable

'Get the Name (String) values from the Enum
Dim EnumNames As String() = System.Enum.GetNames(EnumType)

'Get the Values (Integer) from the Enum
Dim EnumValues As Array = System.Enum.GetValues(EnumType)

'Declare a HashTable to hold the Enum name,value pairs
Dim ht As New Hashtable()

'Loop through all of the name,value pairs in the Enum and add them as new elements to the HashTable
For i As Integer = 0 To EnumNames.Length - 1
ht.Add(EnumNames(i), Integer.Parse(EnumValues.GetValue(i)))
Next

Return ht

End Function

The main issue you will note about the method above is that the HashTable returned will indeed have the enum values in a key-value format but they will not be in the order that they were within the Enum. Typically this is an unwanted result. This class could be expanded to implement an ICompare interface and expose a sorting routine to then sort the HashTable values. However, other object types will give us this functionality with built in ability.

The last type I wrote a Utilities method for that solves the sorting issue is by returning a 'DataTable' object from the Enum type passed in as an argument. Once the DataTable is created by making a table with (2) columns named "key" and "value", we can create a DataView from it using the sort we specify and then return a DataTable type back from the DataView. The code for this is shown below:

Public Shared Function GetDataTableFromEnum(ByVal EnumType As Type) As DataTable

'Get the Name (String) values from the Enum
Dim EnumNames As String() = System.Enum.GetNames(EnumType)

'Get the Values (Integer) from the Enum
Dim EnumValues As Array = System.Enum.GetValues(EnumType)

'Declare a new DataTable with column names "key" and "value"
Dim dt As New DataTable()
dt.Columns.Add("key", GetType(String))
dt.Columns.Add("value", GetType(Integer))

'Loop through all of the name,value pairs in the Enum and add them as new rows to the DataTable
For i As Integer = 0 To EnumNames.Length - 1
Dim dr As DataRow = dt.NewRow
dr("key") = EnumNames(i)
dr("value") = Integer.Parse(EnumValues.GetValue(i))
dt.Rows.Add(dr)
Next

'Sort the DataTable by the value column
Dim dv As DataView = dt.DefaultView
dv.Sort = "value asc"

'Apply the sorted DataView back to the DataTable to be returned
dt = dv.ToTable()

Return dt

End Function

Once again it is important to note that this method is just a base example and could be customized easily to fit your needs. As you can see above, the method automatically sorts based on the "value" column in ascending order. You could add parameters to the method that could dictate the sort. And you could also change this method and just have the DataView returned rather than extracting a DataTable back out of it. Both types can be used as the DataSource for a control like an ASP.NET DropDownList.

Below is the code used to make the call to the Utilities class and have it bound to our 'Months' enumeration.

'Option 1: Bind the DropDownList immdeatly to the Enum type
Utilities.BindDDLToEnum(GetType(Months), Me.ddlMonths, True)

'Option 2: Get a HastTable back from the Enum, and use it however needed:
Dim MyHt As New Hashtable()
MyHt = Utilities.GetHashTableFromEnum(GetType(Months))

'Option 3: Get a DataTable back and then bind on the columns named "key" value"
Dim MyDt As New DataTable
MyDt = Utilities.GetDataTableFromEnum(GetType(Months))
'Set the Text and Value properties which correspond to the "value" and "key" elements
'of the DataTable object created and populated above
Me.ddlMonths.DataTextField = "key"
Me.ddlMonths.DataValueField = "value"
'Set the DataSource Bind the DataView to the passed in DDL control
Me.ddlMonths.DataSource = MyDt
Me.ddlMonths.DataBind()

Lastly is a picture of the bound ASP.NET DropDownList:

The main purpose of this was just to get you as the developer started when needing to bind an Enum to a control like an ASP.NET DropDownList. You can easily expand or modify any of the methods to suit your needs providing the most streamlined use and reusability for your application.